AD
Configuring Kerberos Authentication for Databases with Oracle Unified Directory (OUD)
Use Case:
Centralized user authentication and authorization for the Oracle Databases with the following requirements:
- Use the existing Microsoft Active Directory for centralized authorization i.e., role management
- Should NOT require changes to Active Directory schema
- Should NOT require placing any DLLs on Active Directory domain controllers
- Should NOT synchronize user data to another directory
Solution
For above use case, the solution is to configure databases for Kerberos authentication and deploy the Oracle Unified Directory (OUD) proxy for AD with Enterprise User Security for authorization.
Step by step process:
Topology
Active Directory & Kerberos Server (Microsoft KDC):
- Host name: addemo1.ziontech.demo
- Microsoft Windows Server 2008 R2 Enterprise Edition with Service Pack 1
- Active Directory (incorporating Kerberos Key Distribution Centre (KDC))
- Realm name: ziontech.demoRealm name: ziontech.demo
Oracle Unified Directory:
- Host name: oud.ziontech.demo
- 11.1.2.2.0 version running on Oracle Enterprise Linux 6
Oracle Database:
- Host name: db1.ziontech.demo
- Oracle Enterprise Linux 6Oracle Enterprise Linux 6
- Oracle11g R2 Server Enterprise Edition 11.2.0.4with Oracle Advanced Security Option (ASO)
Oracle Client:
- Host name: win7a.ziontech.demo
- Microsoft Windows 7 64 bitMicrosoft Windows 7 64 bit
- Oracle11g R211.2.0.4 64 bit Client installation with Oracle Advanced Security Option (ASO)
Section 1: On AD machine
1.1 Create two users (principals in Kerberos terminology)
testuser1, which will be used to connect to DB from client
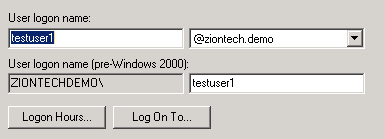 

Second for Oracle DB server,

→ Check password never expires option for sever principal Check password never expires option for sever principal
- The ‘First Name’ is the fully qualified domain name of the machine the Oracle server is running on. The ‘Full Name’ will automatically be filled in.The ‘Full Name’ will automatically be filled in.
1.2 Create Key Table in Windows 2008 R2
The final step on the Windows 2008 R2 server is to extract a key table for the database server principal. This is done using the ktpass tool.
ktpass.exe -princ oracle/db1.ziontech.demo@ZIONTECH.DEMO -mapuser ZIONTECHDEMO\db1.ziontech.demo -crypto all -pass Welcome9 -out c:\keytab
The resulting keytab file should then be transferred to the machine running Oracle
There is a process on how to validate keytab (read this post). Using this approach, we can avoid lot of troubleshooting upfront by ensuring that the KVNO value is compatible.
As mentioned in above referenced post, perform following ldapsearch query to obtain msDS-KeyVersionNumber from Active Directory.
ldapsearch -h ad.ziontech.demo -p 389 -D "testuser1@ziontech.demo" -w "Welcome1" -b "DC=ziontech,DC=demo" -s sub servicePrincipalName=oracle/db1.ziontech.demo msDS-KeyVersionNumber
The output will look like:
CN=db1,CN=Users,DC=ziontech,DC=demo
msDS-KeyVersionNumber=6
Then, increment value of msDS-KeyVersionNumber by 1 and pass it as a value to the parameter -kvno in ktpass command.
We can even specify specific supported algorithm(s) for crypto parameter and use this version of ktpass instead of above.
ktpass.exe -princ oracle/db1.ziontech.demo@ZIONTECH.DEMO -mapuser ZIONTECHDEMO\db1.ziontech.demo -crypto AES256-CTS-HMAC-SHA1-96 -pass Welcome9 -ptype KRB5_NT_PRINCIPAL -kvno 7 -out c:\keytab
1.3 Create a group
→ Create a group called g1 and add testuser1 to it.
Section 2: On OUD machine
2.1 Configure OUD proxy instance
2.1.1 Install JDK and OUD software. Optionally ODSM
Pretty much standard installation. Accept all defaults.
2.1.2 Invoke OUD proxy set up script:
$MW_HOME/Oracle_OUD1/oud-proxy-setup
→ Ensure, to enable SSL In server settingsEnsure, to enable SSL In server settings
→ Select Configure EUS under deployment optionsSelect Configure EUS under deployment options
→ Select Microsoft Active Directory as the backend-server typeSelect Microsoft Active Directory as the backend-server type
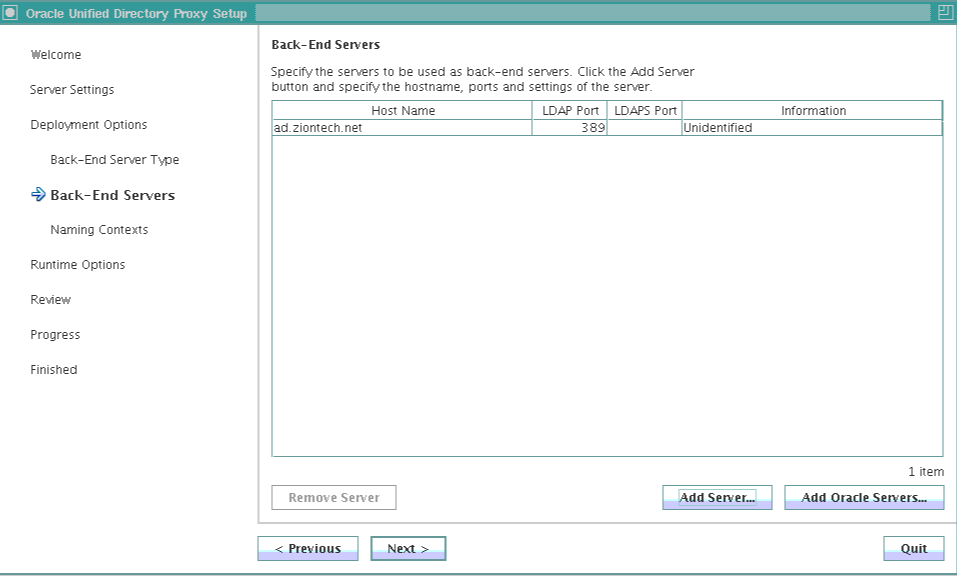
→ Add AD server instanceAdd AD server instance
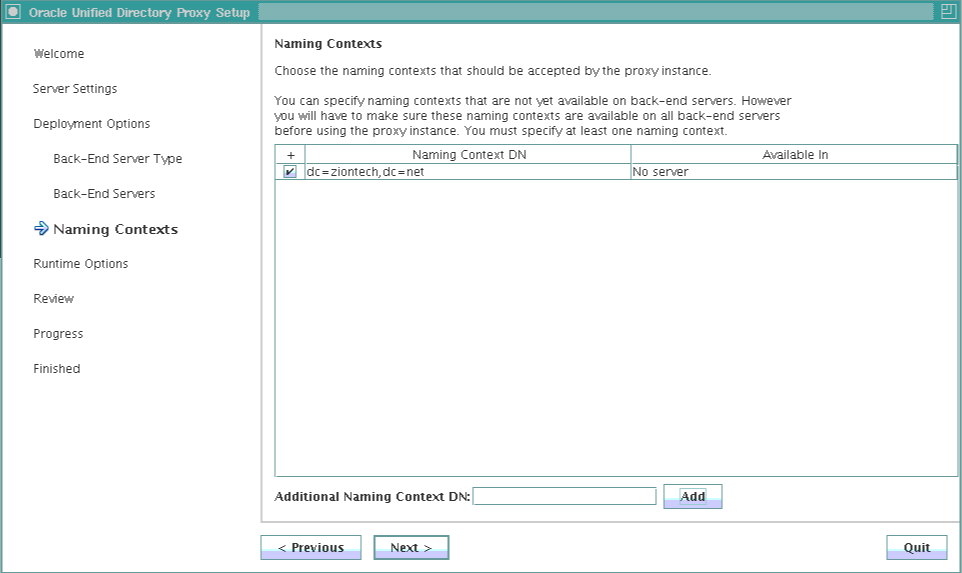
→ Select or specify Naming ContextSelect or specify Naming Context
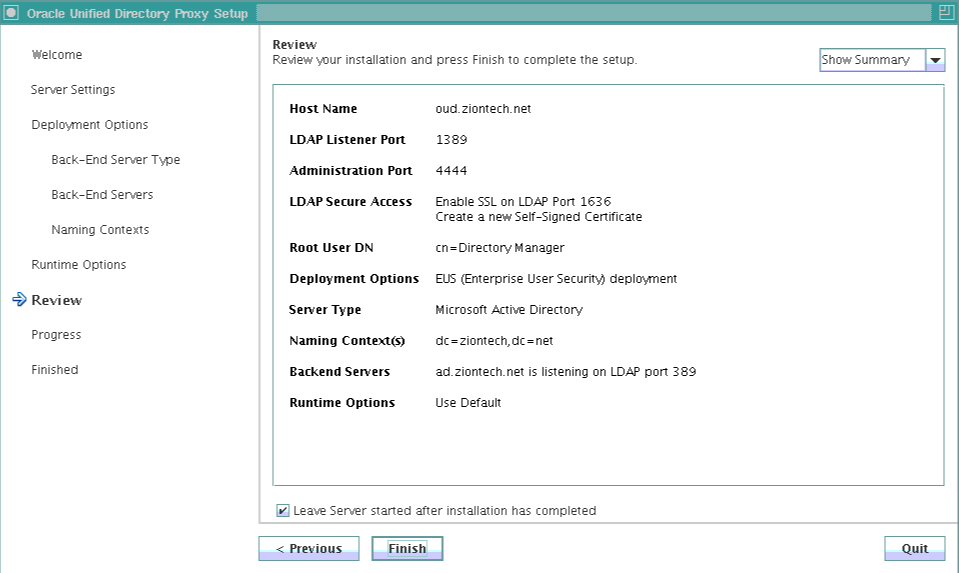
→ FinishFinish
2.1.3 Post Install steps
Configure the proxy workflow elements using dsconfig tool located in $MW_HOME/Oracle_OUD1/bin
dsconfig set-workflow-element-prop \
--element-name proxy-we1 \
--set remote-root-dn:CN=Administrator,CN=Users,DC=ziontech,DC=demo \
--set remote-root-password:Welcome1 \
--hostname localhost \
--port 6444 \
--trustAll \
--bindDN cn=Directory\ Manager \
--bindPasswordFile pwd.txt \
--no-prompt

dsconfig set-workflow-element-prop \
--element-name proxy-we1 \
--add exclude-list:cn=directory\ manager \
--add exclude-list:cn=oraclecontext,dc=ziontech,dc=demo \
--set remote-ldap-server-bind-dn:CN=Administrator,CN=Users,DC=ziontech,DC=demo \
--set remote-ldap-server-bind-password:Welcome1 \
--hostname localhost \
--port 6444 \
--trustAll \
--bindDN cn=directory\ manager \
--bindPasswordFile pwd.txt \
--no-prompt
2.1.4 Update the realm information in the OUD configuration:
Locate the LDIF template file at $MW_HOME/Oracle_OUD1/config/EUS/modifyRealm.ldif
Edit the modifyRealm.ldif file as follows:
→ Replace dc=example,dc=com with dc=ziontech,dc=demoReplace dc=example,dc=com with dc=ziontech,dc=demo
→ Replace ou=people and ou=groups with the correct locations of the user and group entries in ADReplace ou=people and ou=groups with the correct locations of the user and group entries in AD
Use the ldapmodify command to update the configuration with the edited LDIF template file, for example:
$ ldapmodify -h localhost -p 1389 -D "cn=directory manager" -j pwd-file -f modifyRealm.ldif
2.2 Perform following changes in OUD proxy
Modify the attribute orclcommonkrbprincipalattribute in the EUS config (cn=OracleContext,<realm>) to the attribute name which stored the Kerberos principal on AD.
Additionally, I modified few other attributes.
$ ldapmodify -h localhost -p 1389 -D "cn=directory manager" -j pwd-file -f modifyConfig.ldif

# cat modifyConfig.ldif

dn: cn=Common,cn=Products,cn=OracleContext,dc=ziontech,dc=demo
changetype: modify
replace: orclCommonKrbPrincipalAttribute
orclCommonKrbPrincipalAttribute: userPrincipalName
-
dn: cn=Common,cn=Products,cn=OracleContext,dc=ziontech,dc=demo
changetype: modify
replace: orclCommonWindowsPrincipalAttribute
orclCommonWindowsPrincipalAttribute: samaccountname
-
dn: cn=Common,cn=Products,cn=OracleContext,dc=ziontech,dc=demo
changetype: modify
replace: orclCommonNicknameAttribute
orclCommonNicknameAttribute: samaccountname
-
Section 3: On DB machine
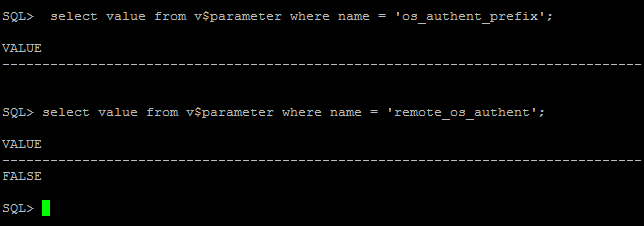
3.1 Verify that the system settings remote_os_authent=false and os_authent_prefix=”” are configured correctly:
SQL> select value from v$parameter where name = 'os_authent_prefix';
SQL> select value from v$parameter where name = 'remote_os_authent';
If you see something like ops$ for os_authent_prefix, it has to be changed to null using following process:

SQL> create pfile='/tmp/pfile.txt' from spfile;
SQL> shutdown immediate;
Add this to the “/tmp/pfile.txt” file:
os_authent_prefix=''
Recreate the pfile:
SQL> sqlplus / as sysdba
SQL> create spfile from pfile='/tmp/pfile.txt';
SQL> startup
3.2 Configure SQLNET for Kerberos
Modify sqlnet.ora with following configuration:
NAMES.DIRECTORY_PATH= (TNSNAMES, EZCONNECT)
ADR_BASE = /app/db1

SQLNET.KERBEROS5_KEYTAB=/app/kerberos/keytab
SQLNET.KERBEROS5_CONF=/app/kerberos/krb5.conf
SQLNET.KERBEROS5_CONF_MIT=TRUE
SQLNET.AUTHENTICATION_KERBEROS5_SERVICE=oracle
SQLNET.AUTHENTICATION_SERVICES=(BEQ,KERBEROS5)
Create /app/kerberos/krb5.conf with following content:
[libdefaults]
default_realm = ZIONTECH.DEMO

[realms]
ZIONTECH.DEMO = {
kdc = addemo1.ziontech.demo:88
}

[domain_realm]
.ziontech.demo = ZIONTECH.DEMO
ziontech.demo = ZIONTECH.DEMO
3.3 Configure and Register Database for directory usage
Configure the database to use the directory:
Run netca and then,
1) Select ‘Directory Usage Configuration’
2) Set the Directory Type to ‘Oracle Internet Directory’
3) Set the Hostname, Port, and SSL Port for the OUD Server
4) Select the Oracle Context to use. In this document, the context used is “cn=OracleContext,dc=ziontech,dc=demo”
5) Click Finish.
This will create an ldap.ora file in the $ORACLE_HOME/network/admin directory with following content:
# ldap.ora Network Configuration File: /app/db1/product/11.2.0/dbhome_1/network/admin/ldap.ora
# Generated by Oracle configuration tools.

DIRECTORY_SERVERS= (oud.ziontech.demo:4389:4636)
DEFAULT_ADMIN_CONTEXT = "dc=ziontech,dc=demo"
DIRECTORY_SERVER_TYPE = OID
Registering Database with the Directory:
Run the Database Configuration Assistant (dbca) from the database Oracle Homes to register the database with OID.
Run dbca and then,
1) Click ‘Next’
2) Select ‘Configure Database Options’
3) Select the database from the list – there may then be a short delay.
4) On the Directory Service screen select ‘Yes, register the database’ and enter the username and password of an OUD user who is authorized to register databases. For example a username of ‘cn=Directory Manager’.
Then enter a password to be used for the new database wallet. This wallet is used to store a randomly generated internal password for the database.
5) Click ‘Next’, and the ‘Next’ again on the Database Components screen.
6) Finally click ‘Finished’ on the Connection Mode screen, and ‘OK’ on the pop-up Confirmation window.
3.4 Create test user and role on Database
Create user:
create user testuser1 identified globally as 'CN=testuser1,CN=Users,DC=ziontech,DC=demo';
grant create session to testuser1;
Create global role in the Database:
create role g1 identified globally;
3.5 Create mappings
These can be performed either by using Oracle Enterprise Manager or using a command line alternative tool ‘eusm’ located under $ORACLE_HOME/bin
# Create a role in Directory
eusm createRole enterprise_role=g1 domain_name="OracleDefaultDomain" realm_dn="dc=ziontech,dc=demo" ldap_host="oud.ziontech.demo" ldap_port=1389 ldap_user_dn='cn=Directory\20Manager' ldap_user_password='Welcome1'
# Map the ENT role with DB role
eusm addGlobalRole enterprise_role="g1" domain_name="OracleDefaultDomain" realm_dn="dc=ziontech,dc=demo" database_name="db1" global_role="g1" dbuser="system" dbuser_password="Welcome1" dbconnect_string="db1.ziontech.demo:1521:db1" ldap_host="oud.ziontech.demo" ldap_port=1389 ldap_user_dn='cn=Directory\20Manager' ldap_user_password='Welcome1'
# Grant Role
eusm grantRole enterprise_role="g1" domain_name="OracleDefaultDomain" realm_dn="dc=ziontech,dc=demo" group_dn="CN=g1,CN=Users,DC=ziontech,DC=demo" ldap_host="oud.ziontech.demo" ldap_port=1389 ldap_user_dn='cn=Directory\20Manager' ldap_user_password='Welcome1'
Section 4: On Client Machine
- Login to Windows 7 client as testuser1 to ZIONTECH.DEMO domain
- Since client Windows PC is a member of Active Directory Domain, and the user has logged into the Windows machine as a domain user, user should be able to connect to Oracle Database without need for Oracle client.
- Client is already installed under default location: C:\app\testuser1\product\11.2.0\client_1\
Modify sqlnet.ora to contain following information:
NAMES.DIRECTORY_PATH= (TNSNAMES, EZCONNECT)

SQLNET.KERBEROS5_CC_NAME=OSMSFT://
SQLNET.AUTHENTICATION_SERVICES= (beq,kerberos5)
SQLNET.KERBEROS5_CONF =c:\kerberos\krb5.conf
SQLNET.KERBEROS5_CONF_MIT = true
Create krb5.conf in the location defined above:
SQLNET.KERBEROS5_CC_NAME=c:\kerberos\cc
SQLNET.AUTHENTICATION_SERVICES= (beq,kerberos5)
SQLNET.KERBEROS5_CONF =c:\kerberos\krb5.conf
SQLNET.KERBEROS5_CONF_MIT = true
Create tnsnames.ora
DB1 =
(DESCRIPTION =
(ADDRESS = (PROTOCOL = TCP)(HOST = db1.ziontech.demo)(PORT = 1521))
(CONNECT_DATA =
(SERVER = DEDICATED)
(SERVICE_NAME = db1.ziontech.demo)
)
)
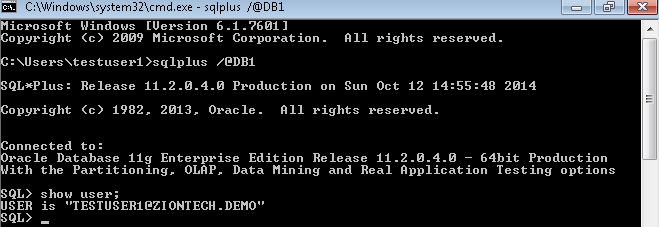
Connect to Database using SQLplus.
User is automatically logged on to database as Oracle Client uses the internal Windows credentials cache.
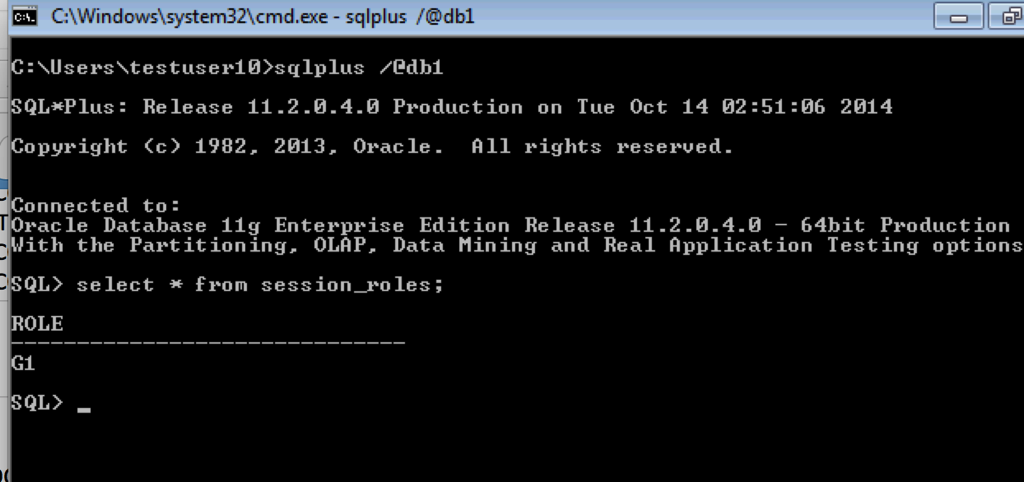
Global role is assigned as expected
Keytab Validation
Setting up Kerberos authentication for the Oracle Databases or WNA with Access Manager is so simple if things go as per plan. To ensure smooth build process, it will be very helpful to perform some form of sanity checks wherever possible. One such check in process of Desktop SSO configuration is validating Keytab.
For a Keytab to successfully function the Key Version Number (KVNO) used by the Key Distribution Center (KDC) and the service principal keys stored in keytab file for services hosted on the system must match.
If not, tickets validation and thus end user authentication will fail. When tracing or debugging is enabled on the products using Keytab, messages similar to following will appear suggesting KNVO mismatch:
- Specified version of key is not available
- Invalid KNVO for Kerberos authentication
Oracle SQLplus clients configured for Kerberos authentication fail with following message.
ORA-12631: Username retrieval failed
Note that ORA-12631 is a very broad error.
The KVNO can get out of synchronization when a new set of keys is created on the KDC without updating the keytab file with the new keys.
Verification process:
We can verify KNVO using the following process:
From Keytab
On he server, where Keytab is located:
$ klist -k -t /app/kerberos/keytab
The out put will look like:
Service Key Table: /app/kerberos/keytab

Ver     Timestamp                   Principal
6 31-Dec-1969 16:00:00 oracle/db1.ziontech.demo@ZIONTECH.DEMO
If klist command is not available, we can use oklist available under Oracle database $ORACLE_HOME/bin
From KDC
Most of the enterprises use Microsoft Key Distribution Center (KDC), which is part of the Active Directory domain services. It uses the Active Directory as its account database and the Global Catalog for directing referrals to KDCs in other domains.
The KNVO for an user object in Active Directory is stored under an operation attribute called msDS-KeyVersionNumber. This can be obtained by following LDAP query:
ldapsearch -h ad.ziontech.demo -p 389 -D "testuser1@ziontech.demo" -w "Welcome1" -b "DC=ziontech,DC=demo" -s sub servicePrincipalName=oracle/db1.ziontech.demo msDS-KeyVersionNumber
The output will look like:
CN=db1,CN=Users,DC=ziontech,DC=demo
msDS-KeyVersionNumber=6
Compare value of msDS-KeyVersionNumber with value under Ver in Keytab. They should match. If not, regenerate keytab using ktpass and replace the current keytab file.
In the above ldapsearch command, options represent the following:
-h hostname of the Active Directory server
-p Active Directory LDAP port
-D BindDN. You can use the default admin account or any other service account with proper read privileges
-w Specify password for Bind DN.
-b root of LDAP tree
Change servicePrincipalName value (oracle/db1.ziontech.demo in above example) according to your environment. Usually, it is same as principal (without @REALM part) found in Keytab.
Configuring Kerberos Authentication for Databases with a Microsoft Windows 2008 R2 Active Directory KDC
This post describes how to configure an Oracle database for Kerberos authentication with Microsoft Windows 2008 R2 Active Directory, and how to configure the Oracle clients.
Topology
Kerberos Server (Microsoft KDC):
- Host name: addemo1.ziontech.demo
- Microsoft Windows Server 2008 R2 Enterprise Edition with Service Pack 1
- Active Directory (incorporating Kerberos Key Distribution Centre (KDC)
- Realm name: ziontech.demoRealm name: ziontech.demo
Oracle Database:
- Host name: db1.ziontech.demo Host name: db1.ziontech.demo
- Oracle Enterprise Linux 6Oracle Enterprise Linux 6
- Oracle11g R2 Server Enterprise Edition with Oracle Advanced Security Option (ASO) with 11.2.0.4
Oracle Client:
- Host name: win7a.ziontech.demoHost name: win7a.ziontech.demo
- Microsoft Windows 7 64 bitMicrosoft Windows 7 64 bit
- Oracle11g R2 64 bit Client installation with Oracle Advanced Security Option (ASO) with 11.2.0.4
ASO approach in this post works only with Oracle Database and Clients 11.2.0.2 patchset or higher
Section 1: On AD machine
1.1 Create two users (principals in Kerberos terminology)
testuser1, which will be used to connect to DB from client

Second for Oracle DB server,

→ Check password never expires option for sever principals
1.2 Create Key Table in Windows 2008 R2
The final step on the Windows 2008 R2 server is to extract a key table for the database server principal. This is done using the KTPASS.EXE tool.
ktpass.exe -princ oracle/db1.ziontech.demo@ZIONTECH.DEMO -mapuser ZIONTECHDEMO\db1.ziontech.demo -crypto all -pass Welcome9 -out c:\keytab
The resulting keytab file should then be transferred to the machine running the Oracle Database
There is a process on how to validate keytab (read this post). Using this approach, we can avoid lot of troubleshooting upfront by ensuring that the KVNO value is compatible.
As mentioned in above referenced post, perform following ldapsearch query to obtain msDS-KeyVersionNumber from Active Directory.
ldapsearch -h ad.ziontech.demo -p 389 -D "testuser1@ziontech.demo" -w "Welcome1" -b "DC=ziontech,DC=demo" -s sub servicePrincipalName=oracle/db1.ziontech.demo msDS-KeyVersionNumber
The output will look like:
CN=db1,CN=Users,DC=ziontech,DC=demo
msDS-KeyVersionNumber=6
Then, increment value of msDS-KeyVersionNumber by 1 and pass it as a value to the parameter -kvno in ktpass command.
We can even specify specific supported algorithm(s) for crypto parameter and use this version of ktpass instead of above.
ktpass.exe -princ oracle/db1.ziontech.demo@ZIONTECH.DEMO -mapuser ZIONTECHDEMO\db1.ziontech.demo -crypto AES256-CTS-HMAC-SHA1-96 -pass Welcome9 -ptype KRB5_NT_PRINCIPAL -kvno 7 -out c:\keytab
Section 2: On DB machine
2.1 Verify that the system settings remote_os_authent=false and os_authent_prefix=”” are configured correctly:
SQL> select value from v$parameter where name = 'os_authent_prefix';
SQL> select value from v$parameter where name = 'remote_os_authent';
If you see something like ops$ for os_authent_prefix, it has to be changed to null using following process:
SQL> create pfile='/tmp/pfile.txt' from spfile;
SQL> shutdown immediate;
Add this to the “/tmp/pfile.txt” file:
os_authent_prefix=''
Recreate the pfile:
SQL> sqlplus / as sysdba
SQL> create spfile from pfile='/tmp/pfile.txt';
SQL> startup
2.2 Configure SQLNET for Kerberos
Modify sqlnet.ora with following configuration:
NAMES.DIRECTORY_PATH= (TNSNAMES, EZCONNECT)
ADR_BASE = /app/db1

SQLNET.KERBEROS5_KEYTAB=/app/kerberos/keytab
SQLNET.KERBEROS5_CONF=/app/kerberos/krb5.conf
SQLNET.KERBEROS5_CONF_MIT=TRUE
SQLNET.AUTHENTICATION_KERBEROS5_SERVICE=oracle
SQLNET.AUTHENTICATION_SERVICES=(BEQ,KERBEROS5)
Create /app/kerberos/krb5.conf with following content:
[libdefaults]
default_realm = ZIONTECH.DEMO

[realms]
ZIONTECH.DEMO = {
kdc = addemo1.ziontech.demo:88
}

[domain_realm]
.ziontech.demo = ZIONTECH.DEMO
ziontech.demo = ZIONTECH.DEMO
2.3 Create test user on Database
create user "TESTUSER1@ZIONTECH.DEMO" identified externally;
grant create session to "TESTUSER1@ZIONTECH.DEMO";
This username must be created in uppercase and must have the realm (Active Directory domain) specified.This username must be created in uppercase and must have the realm (Active Directory domain) specified.
Section 3: On Client Machine
- Login to Windows 7 client as testuser1 to ZIONTECH.DEMO domain
- Since client Windows PC is a member of Active Directory Domain, and the user has logged into the Windows machine as a domain user, user should be able to connect to Oracle Database without need for Oracle client.
- Client is already installed under default location: C:\app\testuser1\product\11.2.0\client_1\
Modify sqlnet.ora to contain following information:
NAMES.DIRECTORY_PATH= (TNSNAMES, EZCONNECT)

SQLNET.KERBEROS5_CC_NAME=OSMSFT://
SQLNET.AUTHENTICATION_SERVICES= (beq,kerberos5)
SQLNET.KERBEROS5_CONF =c:\kerberos\krb5.conf
SQLNET.KERBEROS5_CONF_MIT = true
Create krb5.conf in the location defined above:
SQLNET.KERBEROS5_CC_NAME=c:\kerberos\cc
SQLNET.AUTHENTICATION_SERVICES= (beq,kerberos5)
SQLNET.KERBEROS5_CONF =c:\kerberos\krb5.conf
SQLNET.KERBEROS5_CONF_MIT = true
Create tnsnames.ora
DB1 =
(DESCRIPTION =
(ADDRESS = (PROTOCOL = TCP)(HOST = db1.ziontech.demo)(PORT = 1521))
(CONNECT_DATA =
(SERVER = DEDICATED)
(SERVICE_NAME = db1.ziontech.demo)
)
)
Connect to Database using SQLplus.
User is automatically logged on to database as Oracle Client uses the internal Windows credentials cache.
Integrating OUD and EUS: OUD as Proxy
EUS can be enabled for an OUD proxy server during installation or can be configured later if a proxy instance is already existing. In this post, I will cover steps on how to create a new OUD proxy instance for EUS using a GUI and Active Directory as the backend.
Assumptions:
- OUD base product binaries are already installed and a Web Logic domain (optionally) has been configured for ODSM.
- The Active Directory has user identities to which the OUD will act as proxy.
- An OUD proxy instance will be now created.
Configuring EUS for an OUD proxy server
Change to OUD_install_dir directory. For example:
cd /opt/app/mw/Oracle_OUD/
Ensure JAVA_HOME environment variable is set to a supported JVM.
export JAVA_HOME=/opt/app/jdk
Set INSTANCE_NAME environment variable.
export INSTANCE_NAME=oud-proxy
Run the oud-proxy-setup command to configure the proxy server installation.
./oud-proxy-setup
The utility launches the graphical installer.
- On the Welcome panel, click Next.
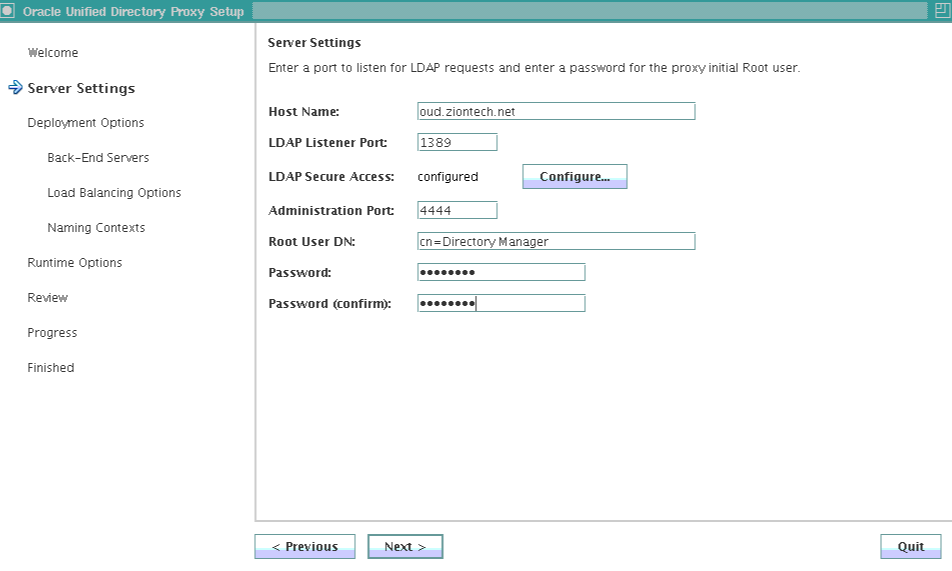
- On the Server Settings panel, enter the proxy server’s host name or IP address, LDAP Port, Password for Root DN.
- Configure the SSL Port by clicking Configure. Click Next to continue.
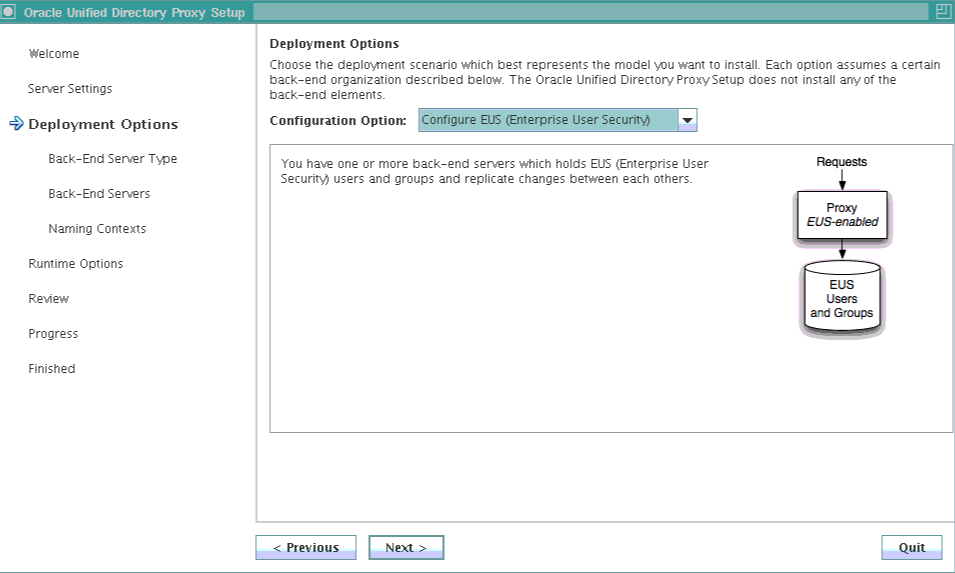
- In the Deployment Options panel, select Configure EUS from the Configuration Option drop-down menu.Click Next to continue.
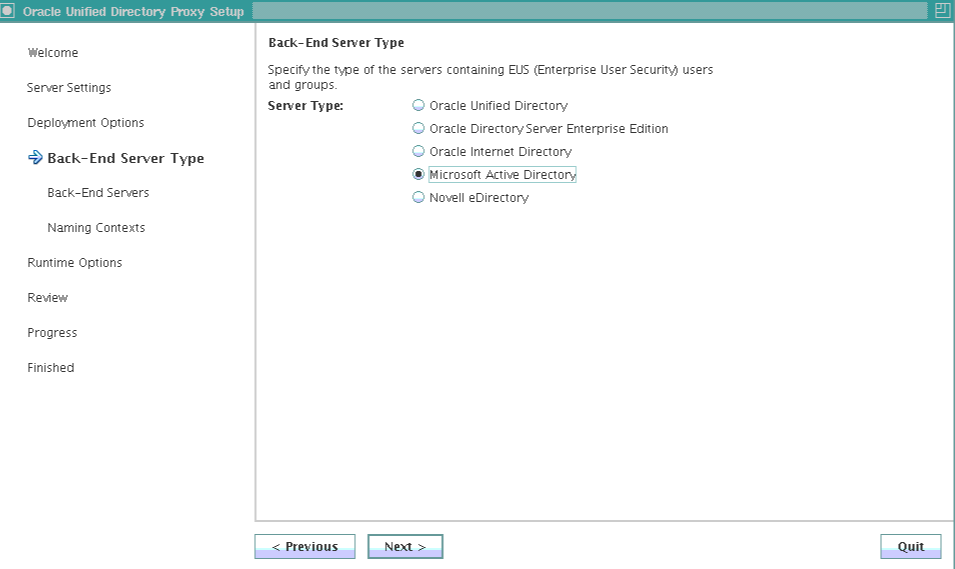
- Select the backend LDAP server type. In my case, it is Active Directory. Click Next.
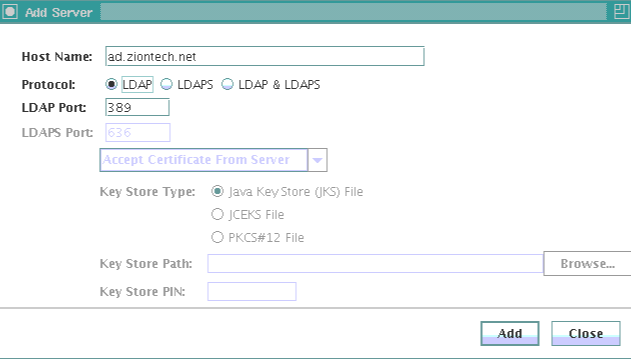
- Click Add Server and provide Active Directory details.
- Enter the naming context.
- On the Runtime options panel, click Change to configure any specific JVM settings, or click Next to run the server with the default JVM settings.
- Review the installation configuration.
- Click Finish to complete the installation.
Screenshots for reference:


Configure the EUS content:
- Once proxy instance is created, we must configure the EUS context for each EUS suffix defined.
- Take a backup of the eusData.ldif file located at $OUD_install_dir/config/EUS/.
- Create a file /tmp/password.txt which contains the password of the Root User DN of the OUD.
- Now edit the eusData.ldif file to replace every occurrence of dc=example and dc=com by the DN of the EUS suffix, and occurrence of cn=orcladmin by the Root User DN.
Then, import the content of the files by running the following command
$OUD_INSTANCE_ROOT/OUD/bin/import-ldif -n oraclecontext -l eusData.ldif -F --hostname localhost --port 4444 --bindDN "cn=directory manager" --bindPasswordFile /tmp/password.txt
- Now, login to ODSM and navigate to Data Browser.
- We must see user identities from an Active Directory through the OUD.
This completes preparing the OUD proxy for EUS. The next steps are to prepare the database and create user mappings.