OPAM – Installation and Configuration
What is OPAM?
Oracle Privileged Account Manager (OPAM) is a secure password management solution designed to generate, provision, and manage access to passwords for privileged accounts like UNIX “root” or Oracle database admin accounts. It enables auditing and establishes accountability for users who normally share privileged account credentials, and has user Session Management and Recording. It leverages the Oracle Platform Security Services (OPSS) framework as a security foundation and Oracle Database as back-end data storage.
While Oracle Privileged Account Manager most commonly manages shared and elevated privileged accounts, OPAM administrators can also use it to manage passwords for any type of account. For example, if the administrator of a certain group is on a leave and you have a business reason for allowing another employee to access the administrator’s system using his/her account, Oracle Privileged Account Manager can manage that privileged account.
What can OPAM do?
- Associates privileged accounts with targets (Target is a software system that contains, uses, and relies on user, system, or application accounts) and policies with privileged accounts.
- Grants users and groups, access to privileged accounts and removes that access after a specified time limit.
- It also provides role-based access to accounts maintained in OPAM accounts.
- Provides password check out and check in, as well as session checkout to control access to accounts
- Resets passwords to a random value on check in and check out by default for security purposes.
- OPAM can be configured to automatically check in privileged accounts after a specified time to protect against multiple open accesses.
- Manages password resets on configured targets.
- Performs Create, Read, Update, Delete, and Search (CRUDS) operations on targets, privileged accounts, and policies.
- Provides an extensible plug-in framework that uses various plug-ins to perform operations such as custom notifications, usage policies, and synchronize passwords.
- OPAM connects to targets by using Identity Connector Framework (ICF) connectors.
- Oracle Privileged Account Manager supports database, LDAP, lockbox, and UNIX target types.
Roles in OPAM:
The following are the four Administrator roles in OPAM:
- Application Configurator (OPAM_APPLICATION_CONFIGURATOR):
Configure Oracle Privileged Account Manager Console and servers, Manage plug-in configurations and Session Manager Configuration properties.
- Security Administrator (OPAM_SECURITY_ADMIN):
Manage Accounts, targets (add, edit, and remove) and password usage and policies.
- Security Auditor (OPAM_SECURITY_AUDITOR):
Open and review Oracle Privileged Account Manager reports.View Oracle Privileged Account Manager Audit reports in the Oracle Identity Navigator Reports portlet.
- User Manager (OPAM_USER_MANAGER):
Assign end users with grants to privileged accounts, Manage Usage Policies. This group can assign Usage Policies to grants and terminate all Oracle Privileged Session Manager sessions for a selected account.
Installation and Configuration – High Level Steps:
Installation Tasks:
1. Schema Creation: Create Schema for OPAM using RCU 11.1.2.x.
2. Install JDK 1.6.29 or higher.
3. Install WebLogic 10.3.6.
4. IAM Suite Installation: Install Identity & Access Management 11gR2 (11.1.2) software under middleware home by running the command:
./runInstaller -jreLoc $JAVA_HOME
5. Weblogic Domain configuration: Run the Oracle Fusion Middleware Configuration Wizard to configure OPAM in a new WebLogic domain.
cd <IAM_Home>/common/bin
./config.sh
Note: During Domain creation select Oracle Privileged Account Manager template. OPAM will be deployed under managed server opam_server1 running on port 18101 and 18102 (non SSL port).
6. Configure Database Security Store for OPAM Domain: We can share the same Database Security Store and use the same domain encryption key from the oim_domain for opam_domain:
- Export the encryption key from the oim_domain
cd <Middleware_Home>/oracle_common/common/bin
./wlst.sh
exportEncryptionKey(jpsConfigFile=”<Middleware_Home>/user_projects/domains/oim_domain/config/fmwconfig/jps-config.xml",keyFilePath=”<Middleware_Home>",keyFilePassword="<password>")
exit()
- Check for the encryption file present in <Middleware_Home> and join the DB Security store to opam_domain by executing the command:
<Middleware_Home> /oracle_common/common/bin/wlst.sh <IAM_Home>/common/tools/configureSecurityStore.py –d <Middleware_Home>/user_projects/domains/opam_domain -c IAM -p <oim store password> -m join -k <Middleware_Home> -w <keyFilePassword>
- This will migrate policy & credential store from XML file (and files) to database under OPSS schema.
Note: In 11gR1 you could keep policy store to XML, OID, or in Database. From 11gR2 onwards policy store must be migrated to Database under OPSS Schema.
Configuration Tasks:
1. Start WebLogic Admin Server for OPAM domain.
2. Set the ANT_HOME, ORACLE_HOME and Permgen Size
export ORACLE_HOME=<Middleware_Home>/Oracle_IDM1
export ANT_HOME=<Middleware_Home>/org.apache.ant_1.7.1
export ANT_OPTS="-Xmx512M -XX:MaxPermSize=512m"
3. Configuring OPAM: Enter relevant details when prompted and restart the Admin server
cd <IAM_Home>/opam/bin
./opam-config.sh
4. OPAM Server:
- Start the OPAM server:
cd <Middleware_Home> /user_projects/domains/opam_domain
./startManagedWeblogic.sh opam_server1
- Check the status by opening a web browser and going to https://<host>:18102/opam and login via Weblogic Admin credentials.
- Check the OPAM Admin console by browsing to https://<host>:18101/oinav/opam
5. Configure OPAM Identity Store:
- We can configure any Directory Service as an Identity store. We use the embedded Weblogic LDAP Directory as the Identity store for OPAM.
- We do not need to create a separate Authentication Provider, instead we can use the DefaultAuthenticator. External Identity store can be used while integrating OPAM with OIM.
- Create an Admin user in the Weblogic LDAP Directory by browsing to https://<host>:<Admin_port>/console and login using Weblogic Admin credentials.
- Navigate to Security Realms-> myrealm->Users and Groups->New and create “opam_admin”.
6. Assign OPAM Admin role to user:
- Log into Oracle Identity Navigator ( https://<host>:18101/oinav ) with Weblogic Admin credentials and go to the Administrator tab.
- Search for “opam_admin” user and assign the Application Configurator
- Log into OPAM console ( https://<host>:18101/oinav/opam ) with “opam_admin” credentials and confirm.
7. Manage Targets:
- Log into OIN with Weblogic Admin credentials and assign the Security Admin role to opadmin user.
- Log into OPAM console and check for Administrator Tab. Now we can add Targets and Accounts to be managed.
OPAM – OIM Integration
Configuring an External Identity Store for OPAM
To configure the Oracle Unified Directory authenticator in Oracle WebLogic Server:
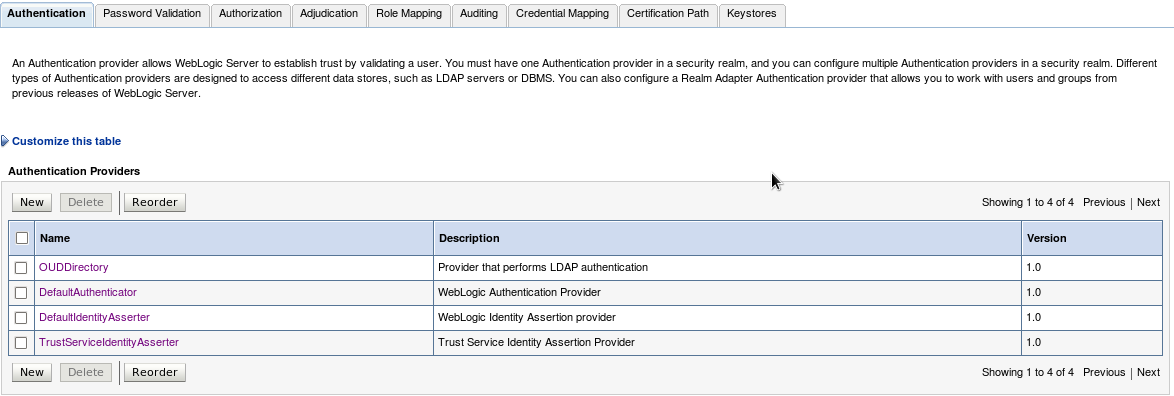
1. Log in to the WebLogic Administration Console, and access Security Realms –> myrealm –> Providers Tab –> Authentication sub-tab and create a New Authentication Provider (OUDDirectory).
- Name: Enter a name for the Authentication provider. For example, OUDDirectory.
- Type: Select IPlanetAuthenticator from the list.
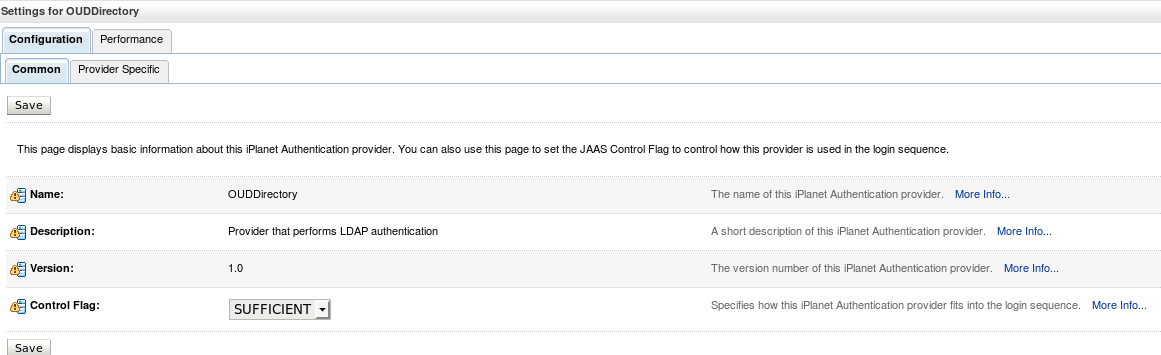
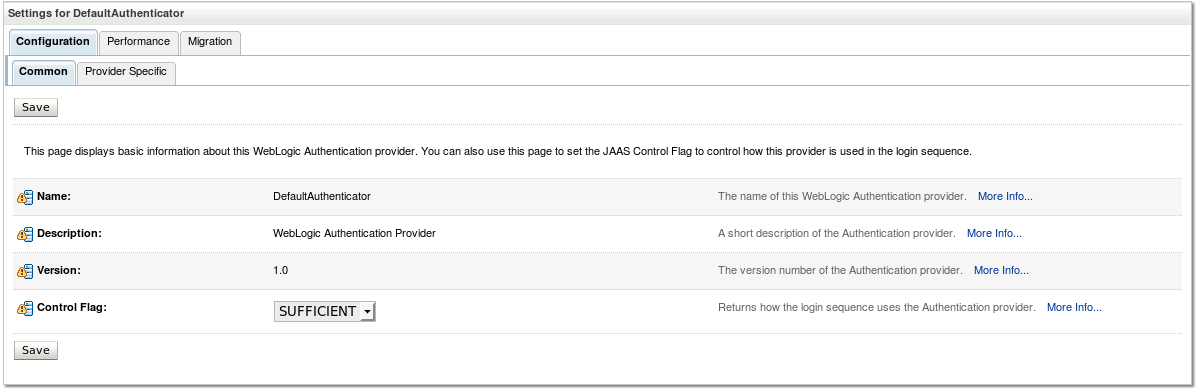
2. Set the Control Flags of the newly added authenticator and the default authenticator to ‘SUFFICIENT’.
The possible values for the Control Flag attribute are:
- REQUIRED – This Login Module must succeed. Even if it fails, authentication proceeds down the list of Login Modules for the configured Authentication providers.
- REQUISITE – This Login Module must succeed. If other Authentication providers are configured and this Login Module succeeds, authentication proceeds down the list of Login Modules. Otherwise, control is returned to the application.
- SUFFICIENT – This Login Module need not succeed. If it does succeed, return control to the application. If it fails and other Authentication providers are configured, authentication proceeds down the Login Module list.
- OPTIONAL – This Login Module can succeed or fail. However, if all Authentication providers configured in a security realm have the JAAS Control Flag set to OPTIONAL, the user must pass the authentication test of one of the configured providers.
Note: Control Flag attribute determines the ordered execution of the Authentication providers.
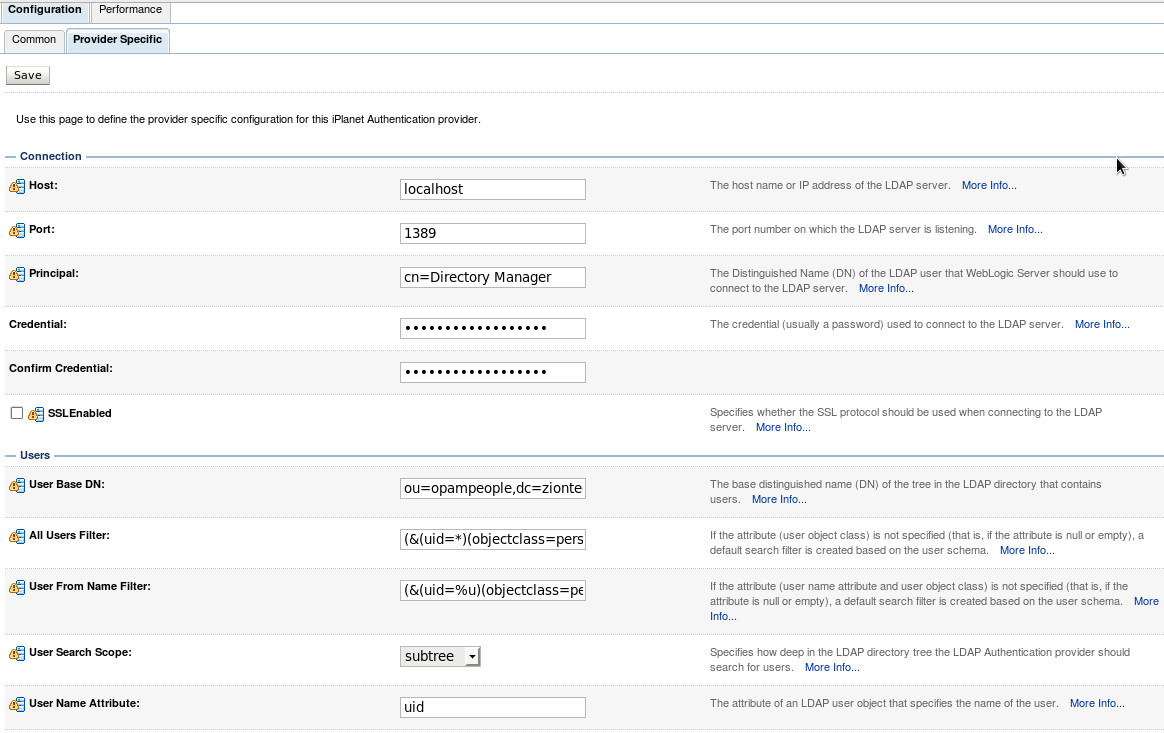
3. Select the “Provider Specific” tab and enter the required values for your environment (Host, Port, Principal, User and Group DN’s, etc.) and save it.
4. Reorder the authenticators to move the new authenticator into the first position in the list.
5. Activate changes and restart Oracle WebLogic Server.
Preparing the Identity Store
Pre-configuring the identity store extends the schema in Oracle Unified Directory.
1. Set the environment variables:MW_HOME, JAVA_HOME, and ORACLE_HOME
2. Create a properties file, called extend.props and enter the required details.
For example:
IDSTORE_HOST: idstore.mycompany.com
IDSTORE_PORT: 1389
IDSTORE_BINDDN: cn=Directory Manager
IDSTORE_USERNAMEATTRIBUTE: uid
IDSTORE_LOGINATTRIBUTE: uid
IDSTORE_USERSEARCHBASE: cn=Users, dc=mycompany, dc=com
IDSTORE_GROUPSEARCHBASE: cn=Groups, dc=mycompany, dc=com
IDSTORE_SEARCHBASE: dc=mycompany, dc=com
IDSTORE_SYSTEMIDBASE: cn=systemids, dc=mycompany, dc=com
3. Configure the identity store by using the idmConfigTool command, which is located at:
cd <IAM_HOME>/idmtools/bin
./idmConfigTool.sh -preConfigIDStore input_file=extend.props, dc=mycompany, dc=com
Create Users and Groups for OPAM
You must fill the identity store with the users and groups that are required by Oracle Privileged Account Manager. To create the necessary users and groups, perform the following tasks:
1. Set the environment variables:MW_HOME, JAVA_HOME, and ORACLE_HOME (set it to IAM_HOME).
2. Create a properties file, called apm.props with the system details.
IDSTORE_HOST: oim.mycompany.com
IDSTORE_PORT: 1389
IDSTORE_BINDDN: cn=Directory Manager
IDSTORE_USERNAMEATTRIBUTE: uid
IDSTORE_LOGINATTRIBUTE: uid
IDSTORE_USERSEARCHBASE: cn=Users, dc=mycompany, dc=com
IDSTORE_GROUPSEARCHBASE: cn=Groups, dc=mycompany, dc=com
IDSTORE_SEARCHBASE: dc=mycompany, dc=com
POLICYSTORE_SHARES_IDSTORE: true
IDSTORE_APMUSER: opam_admin
3. Configure the identity store by using the idmConfigTool command, which is located at:
cd <IAM_HOME>/idmtools/bin
./idmConfigTool.sh -prepareIDStore input_file=apm.props, dc=mycompany, dc=com
Manually Preparing the Directory
Create the below 4 roles in the OUD Directory to manage the Accounts in OPAM
- OPAM_APPLICATION_CONFIGURATOR
- OPAM_SECURITY_ADMIN
- OPAM_SECURITY_AUDITOR
- OPAM_USER_MANAGER
End Users: Oracle Privileged Account Manager End Users are not assigned any roles, so they have limited access to Oracle Privileged Account Manager user interface components. These users are only entitled to perform certain tasks; which includes viewing, checking out, and checking in privileged accounts for which they have been granted access.
Adding the CA Certificate for OPAM
You must configure Oracle Privileged Account Manager’s Catalog Synchronization task to include the Oracle Privileged Account Manager server’s web service Certificate authority (CA) certificate or HTTPS calls to the OPAM server cannot succeed.
This process is done in two steps:
- Retrieve the CA Certificate
- Import the CA Certificate
1. Retrieve the CA Certificate
To retrieve the Oracle Privileged Account Manager server’s CA certificate:
- From your browser, connect to the OPAM server web service:
https:/hostname:sslport/opam
- Locate and save the CA certificate (.pem) file to the trust store.
- For example, from a Firefox browsers, Click the lock icon in the browser’s address bar.
When the information dialog displays, Go to More Information –> View certificate –> Certificate Viewer dialog –> Details tab to view the Certificate Hierarchy.
- Select the first certificate in the Certificate Hierarchy list, and then click Export.
- When the Save Certificate to File dialog displays, navigate to the directory where you want to save the file.
- Select X.509 Certificate (PEM) from the Save as type menu, enter opam.pem as the file name, and click Save.
2. Import the CA Certificate
Run the following command to import the CA certificate file, opam.pem, into the WebLogic trust store on the server where you are running Oracle Identity Manager:
Keytool -import -file FILE_LOCATION -keystore TRUSTSTORE_LOCATION -storepass TRUSTSTORE_PASSWORD -trustcacerts -alias ALIASwhere,
FILE_LOCATION: Full path and name of the certificate file.
ALIAS: Alias for the certificate.
TRUSTSTORE_PASSWORD: Password for the trust store.
TRUSTSTORE_LOCATION: Trust store path.
Setting Up OIM for the Integration
- Installing and Configuring the OUD connector
- Creating an OUD Application Instance.
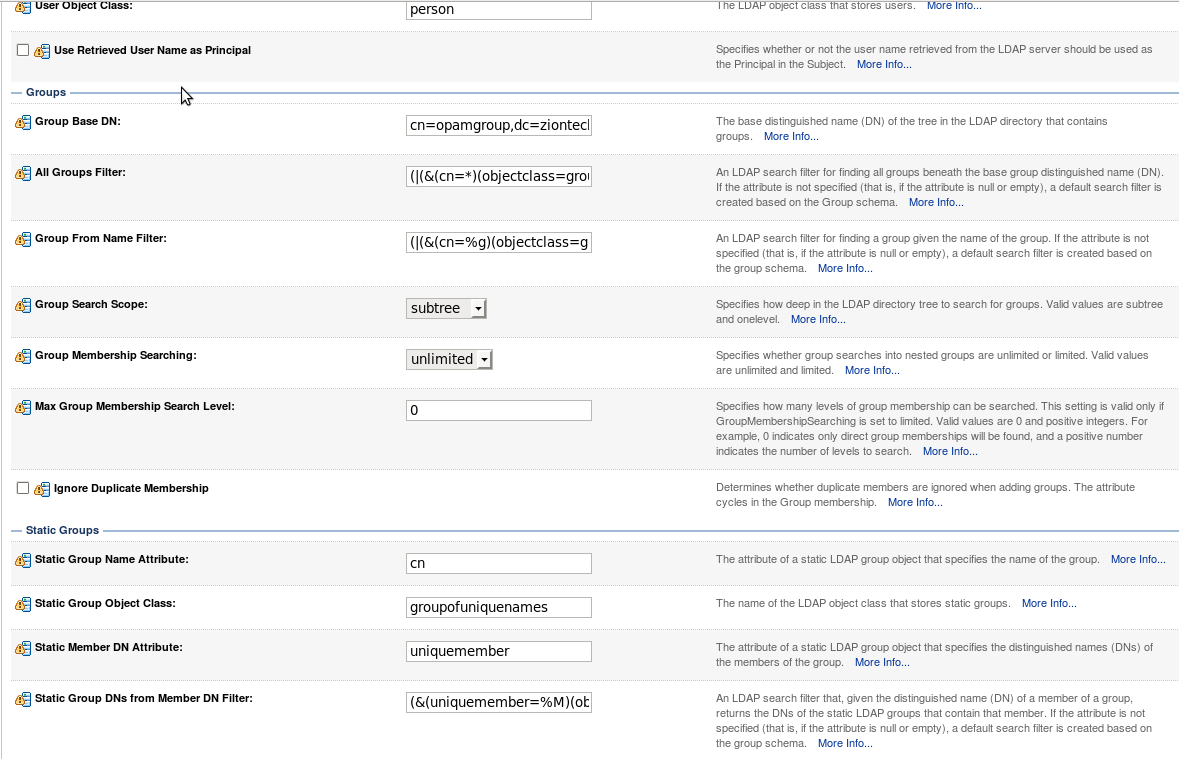
- Create Group (opamgroup) in OUD (Identity store).
- Run Organization and Group Look up recon Schedulers from OIM ‘sysadmin’ console and verify in the corresponding Lookups in the design console.
- Run the catalog Sync Scheduler Job and check the Entitlements are added in the OUD Application Instance.
Once connector is installed and configured successfully, then do the following steps to integrate OPAM with OIM.
- Run the opamSetup Script.
- Create the OPAM_TAGS UDF.
- Tagging Catalog Entries with Oracle Privileged Account Manager Metadata
1. Running the opamSetup Script
For the Oracle Privileged Account Manager-Oracle Identity Manager integration, you must run the OPAM-OIM integration setup script, which is available in the following directory:<OIM Oracle Home>/server/bin
1. Set APP_SERVER, OIM_ORACLE_HOME, JAVA_HOME, MW_HOME, DOMAIN_HOME parameters.
2. Run opamsetup.sh command.
Enter OIM URL: t3://<oimhost>: <oimport>
Enter OIM username: xelsysadm
Enter OIM user password: ********
Enter OPAM IT resource name: OPAMITR
Enter OPAM server name: <OPAM server host name>
Enter OPAM server port: 18102
Enter OPAM user: opam_admin
Enter OPAM user password: ********
Enter ID Store IT resource name: OUD Server
Enter Context: weblogic.jndi.WLInitialContextFactory
This script performs the following tasks:
- Creates OPAM IT resource
- Creates a UDF column named OPAM_TAGS in the Oracle Identity Manager catalog.
- Creates an Oracle Privileged Account Manager synchronization scheduled job
- Creates the OIM.OPAM.Integration system property (if it does not yet exist) and sets it to true.
If any of these tasks fail, the script automatically executes the next task.
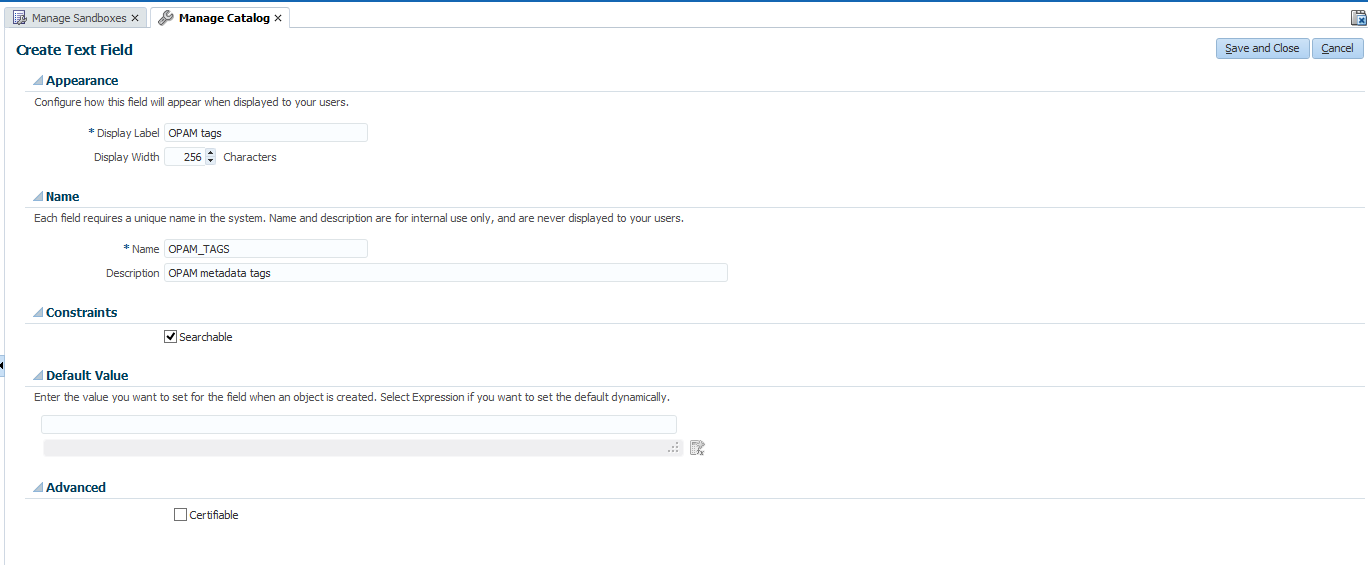
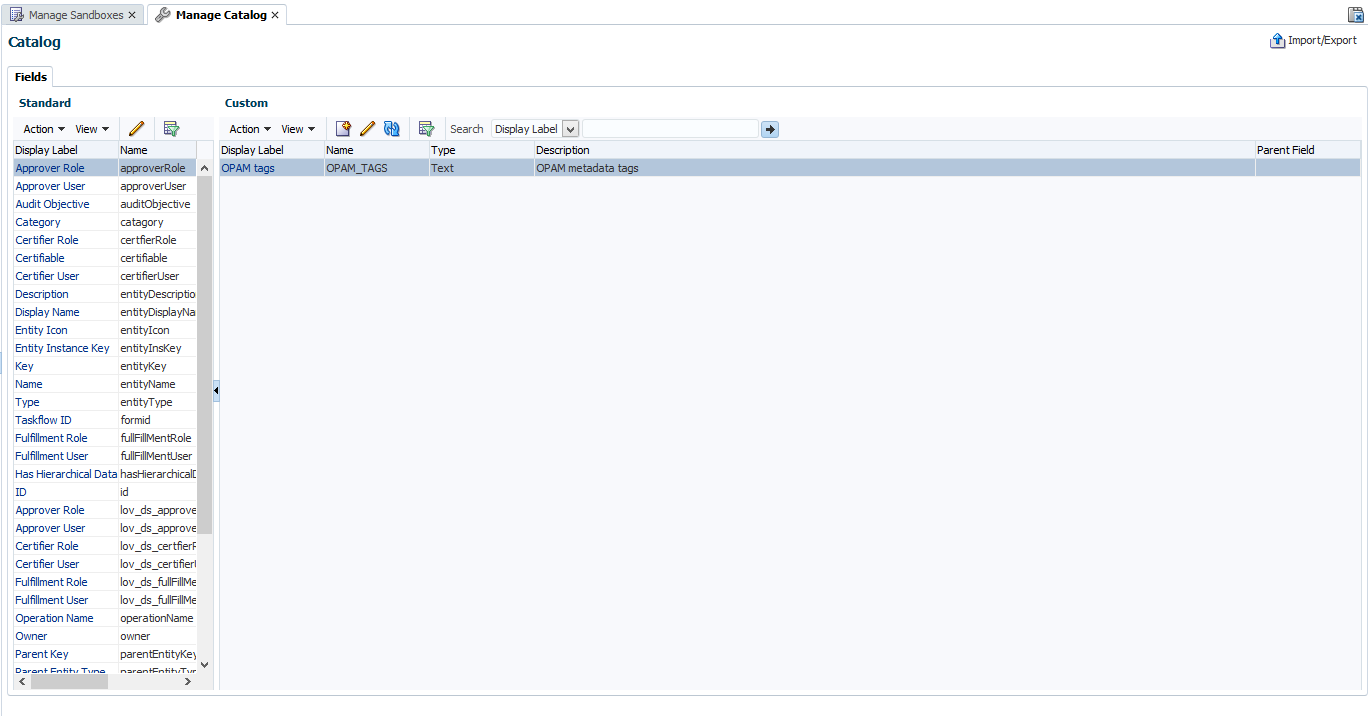
2. Creating the ‘OPAM_TAGS’ UDF
After setting up the Oracle Privileged Account Manager-Oracle Identity Manager integration environment, you must manually create an OPAM_TAGS user-defined field (UDF) in the Oracle Identity Manager catalog. This enables Oracle Privileged Account Manager to search the Oracle Identity Manager catalog.
To manually create the ‘OPAM_TAGS’ UDF, perform the following steps:
- Log in to ‘sysadmin’ console and create and activate a sandbox.
- Click Catalog to open the manage Catalog page.
- Create a custom field icon and specify the necessary settings and then verify that the UDFs appear in the custom fields table.
- Publish Sandbox.

3. Tagging Catalog Entries with OPAM Metadata
The Oracle Privileged Account Manager Catalog Synchronization Job created by the opamSetup script, tags the catalog entries with the Oracle Privileged Account Manager metadata. Go to Schedulers page in ‘sysadmin’ console, and run the OPAM Catalog Synchronization job.
The purpose of this scheduler is to get all groups and entitlements added by target privileged account user and update the catalog entitlement OPAM_TAGS field with the target information.
Testing OIM – OPAM Integration
1. Create a test user in OIM and provisioned user to OUD.
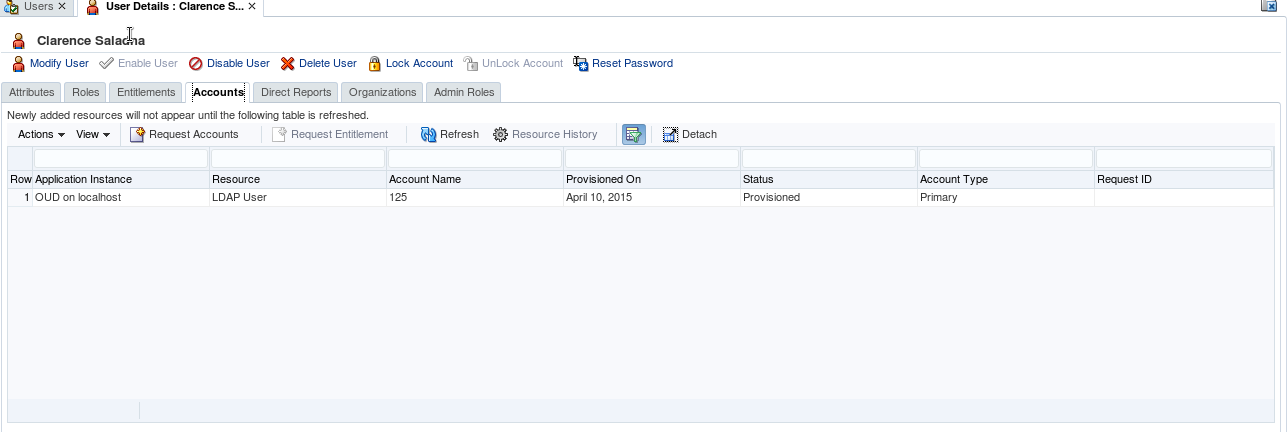
2. Login into OPAM as opam_admin and check the list of privileged target accounts assigned to group (opamgroup).

3. Before assigning this group, login OPAM console with the created test user and check the Accounts. (The created user shouldn’t have any privileged accounts).
4. Now we are going assign “DEV_OIM” privileged account to the test user (CSALADNA) through OIM by searching the catalog with privileged account name/ target type/ target domain/ target name which will display the all entitlements containing the ‘opamgroup’.
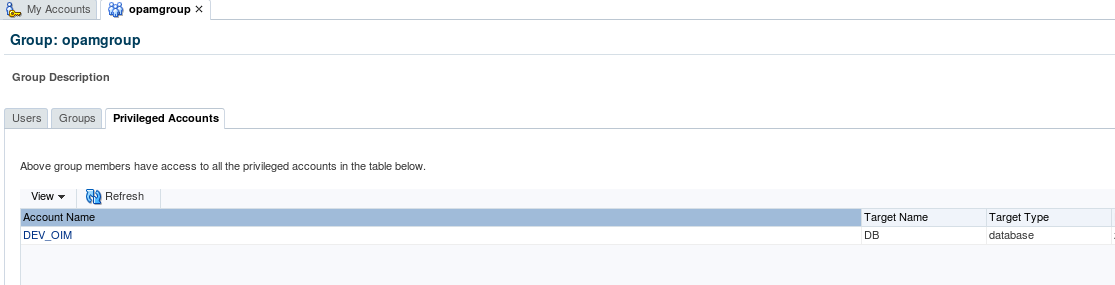
5. Login OPAM console with CSALADNA and check the Accounts. (It will display privileged target Accounts related to ‘opamgroup’).

6. In Group grantees, login with admin user in OPAM console and check for the user “CSALADNA” in the list of users.

This successfully completes the Integration of OPAM and OIM.