Integrating OUD and EUS: Troubleshooting
Here are some of the commonly seen issues during integrating a database with Directory Services:
Issue 1: The Directory Service tab is not displayed in DBCA
- Is ldap.ora correctly configured? Compare with the example earlier in this section.
Create an ldap.ora in $ORACLE_HOME/network/admin that points to your directory services instance. The file may be created using the Network Configuration Assistant (netca) or any text editor. Below is an example of the content of the file.
         DIRECTORY_SERVERS= (oud.ziontech.net:1389:1636)
         DEFAULT_ADMIN_CONTEXT = "dc=ziontech,dc=net"
         DIRECTORY_SERVER_TYPE = OID
- Is the correct ldap.ora located in DBCA? Check that the correct ldap.ora is located first in the search path.
Issue 2: DBCA fails to complete registration, Database Configuration Assistant: Error. Unable to create database entry in the directory service. – No Listeners configured
- Check that a copy of the listener.ora exists in the default network admin directory and that it was created via the Oracle network tools (i.e., Net Manager or Net Configuration Assistant).
- Check if the environment variables, such as TNS_ADMIN, are configured to point to the correct directory.
Issue 3: DBCA fails to complete registration, Database Configuration Assistant: Error.Unable to create database entry in the directory service
- Check if the database is already configured for LDAP Naming resolution. If the entry exists, the DBCA failed to register to OID.
- Remove the current LDAP entry before trying to register the database again. A LDAP naming entry have to be deleted using Net Manager.
I will keep updating this post with any new issues that I encounter.
Integrating OUD and EUS: OUD as Proxy
EUS can be enabled for an OUD proxy server during installation or can be configured later if a proxy instance is already existing. In this post, I will cover steps on how to create a new OUD proxy instance for EUS using a GUI and Active Directory as the backend.
Assumptions:
- OUD base product binaries are already installed and a Web Logic domain (optionally) has been configured for ODSM.
- The Active Directory has user identities to which the OUD will act as proxy.
- An OUD proxy instance will be now created.
Configuring EUS for an OUD proxy server
Change to OUD_install_dir directory. For example:
cd /opt/app/mw/Oracle_OUD/
Ensure JAVA_HOME environment variable is set to a supported JVM.
export JAVA_HOME=/opt/app/jdk
Set INSTANCE_NAME environment variable.
export INSTANCE_NAME=oud-proxy
Run the oud-proxy-setup command to configure the proxy server installation.
./oud-proxy-setup
The utility launches the graphical installer.
- On the Welcome panel, click Next.
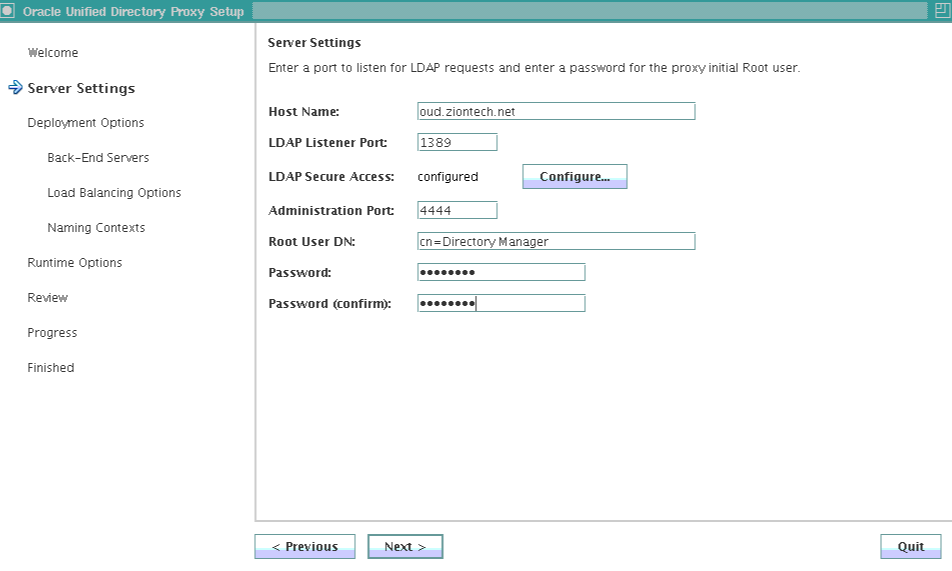
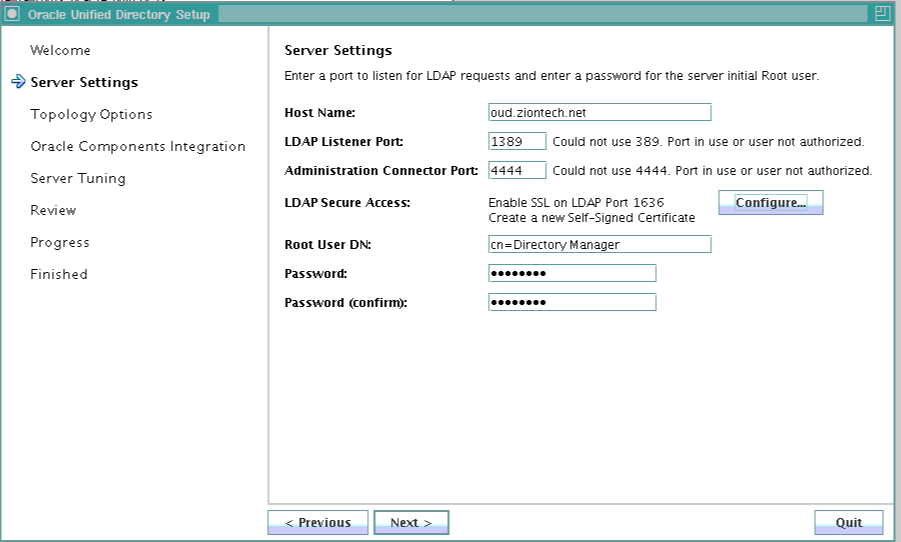
- On the Server Settings panel, enter the proxy server’s host name or IP address, LDAP Port, Password for Root DN.
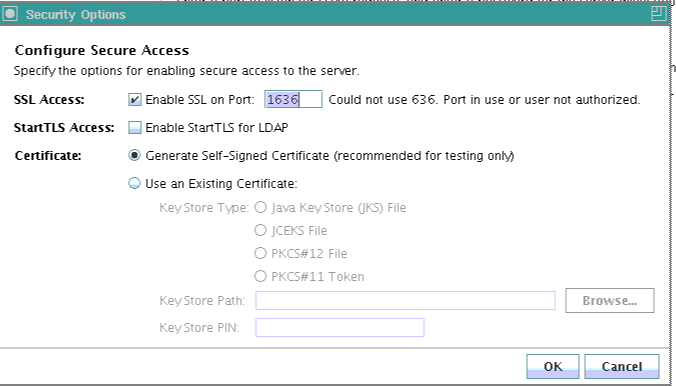
- Configure the SSL Port by clicking Configure. Click Next to continue.
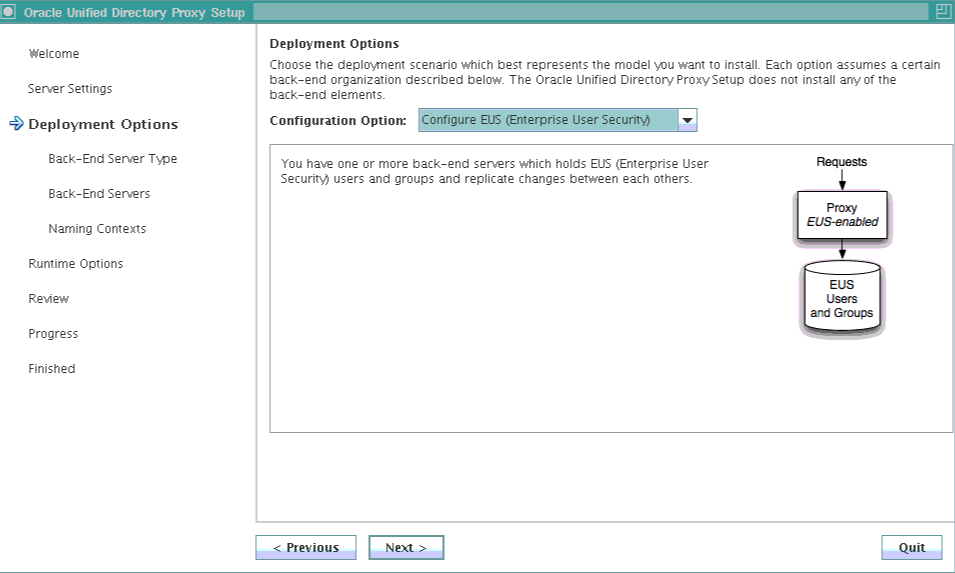
- In the Deployment Options panel, select Configure EUS from the Configuration Option drop-down menu.Click Next to continue.
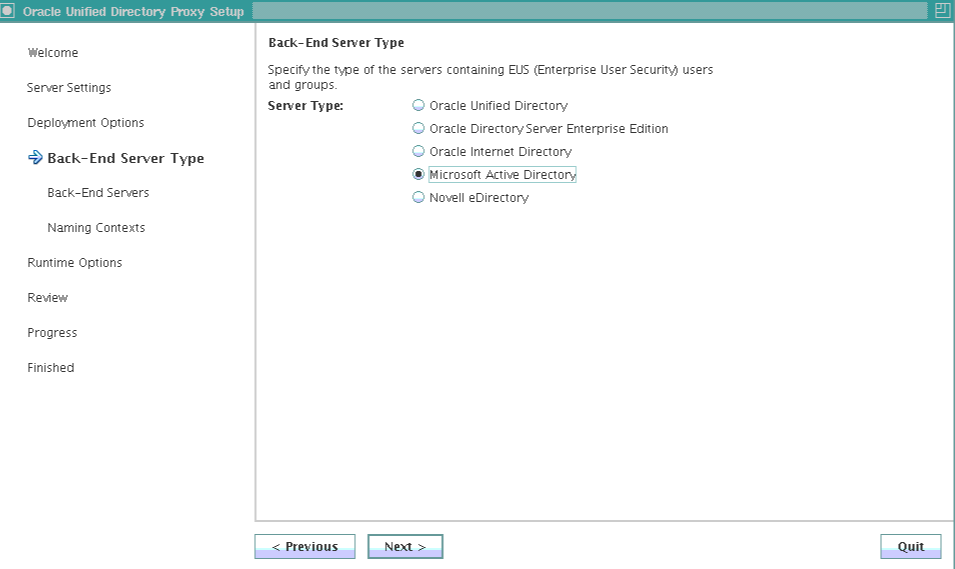
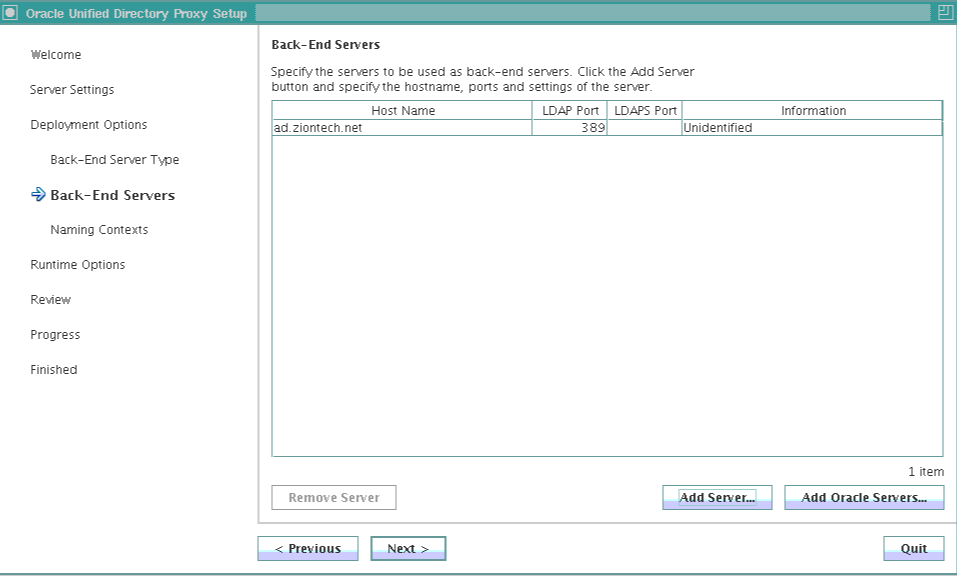
- Select the backend LDAP server type. In my case, it is Active Directory. Click Next.
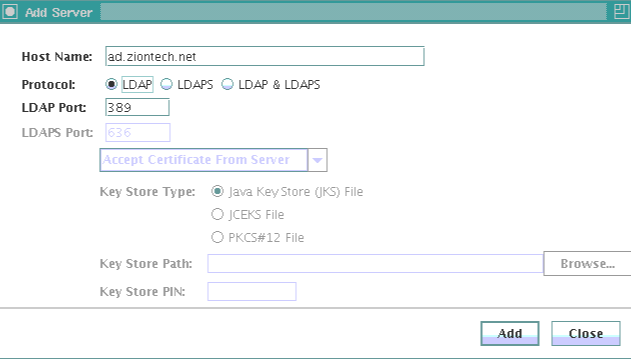
- Click Add Server and provide Active Directory details.
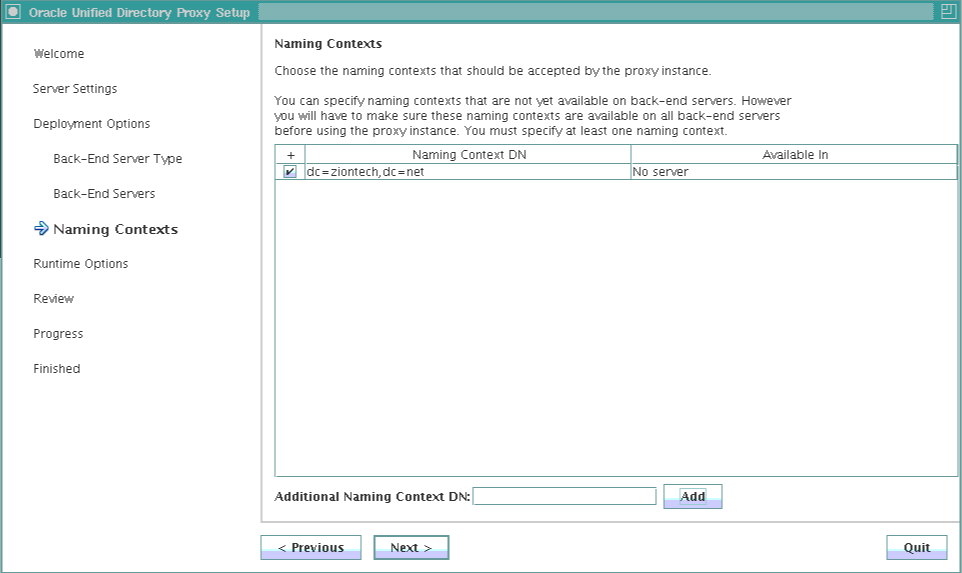
- Enter the naming context.
- On the Runtime options panel, click Change to configure any specific JVM settings, or click Next to run the server with the default JVM settings.
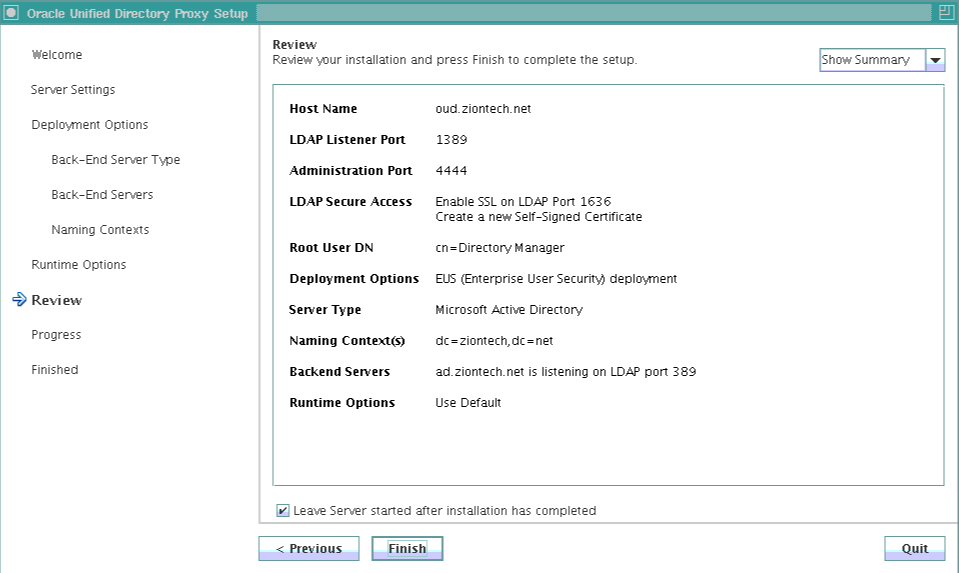
- Review the installation configuration.
- Click Finish to complete the installation.
Screenshots for reference:


Configure the EUS content:
- Once proxy instance is created, we must configure the EUS context for each EUS suffix defined.
- Take a backup of the eusData.ldif file located at $OUD_install_dir/config/EUS/.
- Create a file /tmp/password.txt which contains the password of the Root User DN of the OUD.
- Now edit the eusData.ldif file to replace every occurrence of dc=example and dc=com by the DN of the EUS suffix, and occurrence of cn=orcladmin by the Root User DN.
Then, import the content of the files by running the following command
$OUD_INSTANCE_ROOT/OUD/bin/import-ldif -n oraclecontext -l eusData.ldif -F --hostname localhost --port 4444 --bindDN "cn=directory manager" --bindPasswordFile /tmp/password.txt
- Now, login to ODSM and navigate to Data Browser.
- We must see user identities from an Active Directory through the OUD.
This completes preparing the OUD proxy for EUS. The next steps are to prepare the database and create user mappings.
Integrating OUD and EUS: Users and Groups Mapping
After preparing the OUD and the database for EUS, users from the directory can be authenticated to the database. However, they have to be associated with a schema in the database.
Directory identities are mapped to database schemas. The database schema can be dedicated or a shared schema. Directory groups are mapped to database roles.
Create a shared schema in the database
- Creating a shared schema in the database enables one to map multiple enterprise users to the same schema.
- Run the following similar SQL statements on the database to create a user and grant basic connect access.
- We will then map a subtree from the OUD to this shared schema.
CREATE USER global_ident_schema_user IDENTIFIED GLOBALLY;
GRANT CONNECT TO global_ident_schema_user;
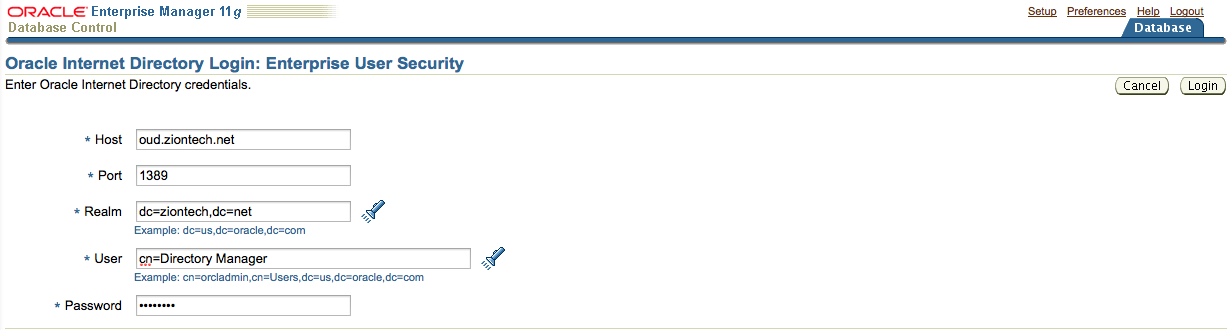
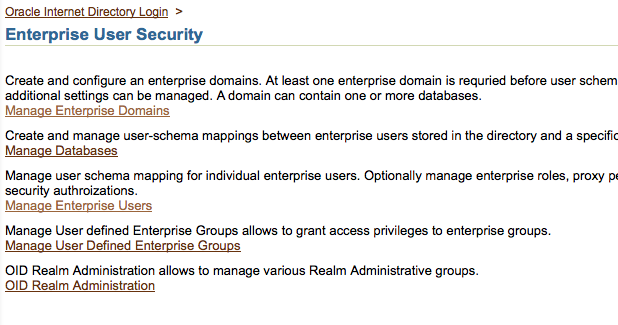
- Now login to the database Enterprise Manager and select Enterprise User Security under the Server tab.
- Provide directory manager credentials and login.
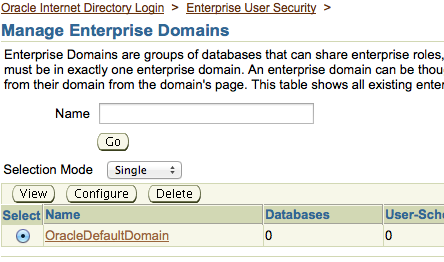
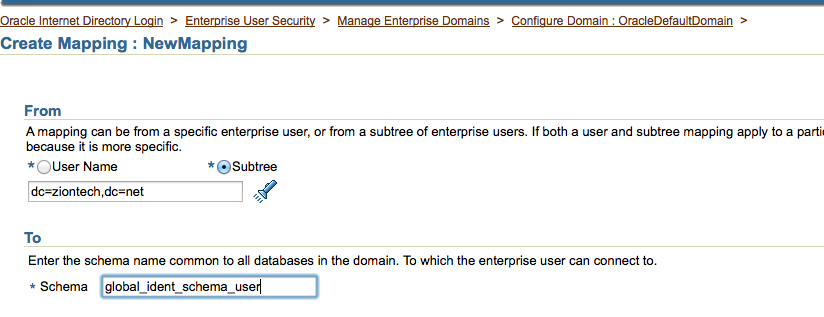
- Click Manage Enterprise Domains, click Configure, and go to the User Schema Mappings tab.
- Click on Create.
- Select Subtree and click on torch icon to select all users to map to this shared schema. Click Continue.
- Now try to login to the database with OUD user credentials.
Creating a dedicated schema in the database
To map a directory user directly to a database schema, the first step is to get the complete DN of this particular user from the OUD.
A complete DN looks like this:
uid=nasir,ou=people,dc=ziontech,dc=net
Now, on the database run the following statements to create a user called ldap_nasir locally in the database. This will be authenticated using OID credentials.
create user ldap_nasir identified globally as 'uid=nasir,ou=people,dc=ziontech,dc=net';
We can also alter an existing user in the database so that the user will now use OUD credentials to login.
alter user existing_user identified globally as 'uid=nasir,ou=people,dc=ziontech,dc=net';
Mapping roles
- Similarly, we can map database groups and roles under the enterprise roles table and proxy permission.
- We will now create a global role in the database that allows access to the hr.employees table. The following SQL statements create a global role, hr_access, and grant the necessary privilege to it.
CREATE ROLE hr_access IDENTIFIED GLOBALLY;
GRANT SELECT ON hr.employees TO hr_access;
- Next, we create an enterprise role called hr_access and assign the global role to it. We then assign this enterprise role to the enterprise user, nasir. The enterprise role can be created using Enterprise Manager.
To create the enterprise role, hr_access:
- Log in to Enterprise Manager.
- Click the Server tab. Under the Security section, click Enterprise User Security.
- Enter the distinguished name (DN) of a directory user who can administer enterprise users in the User field. Enter the user password in the Password field. Click Login.
- The Enterprise User Security page appears.
- Click Manage Enterprise Domains.
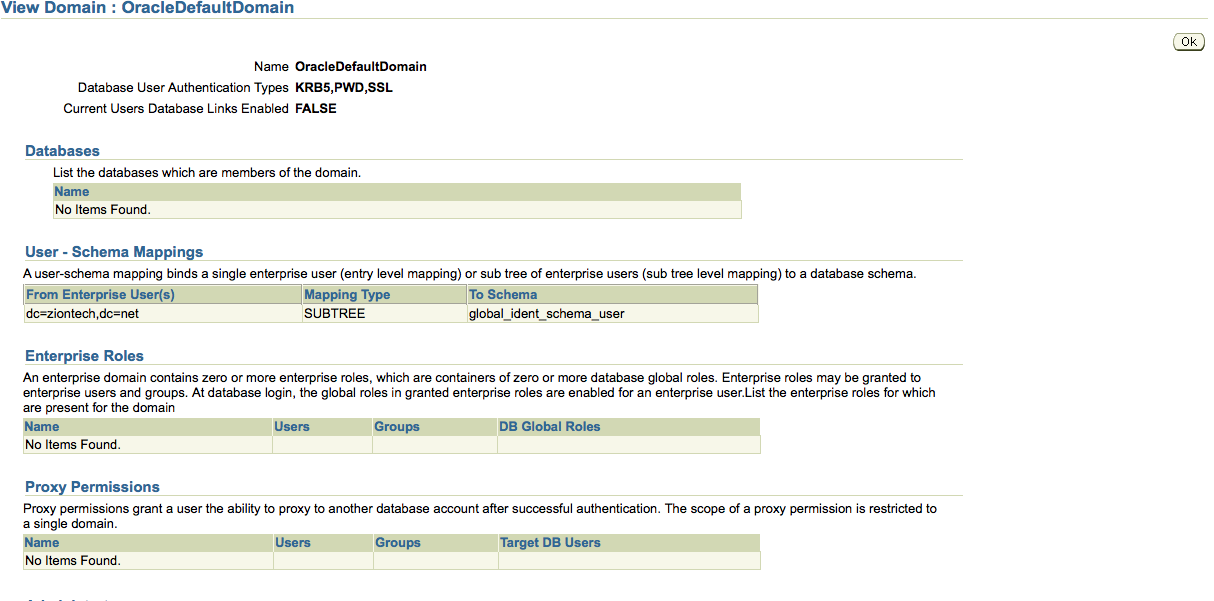
- The Manage Enterprise Domains page appears. This page lists the enterprise domains in the identity management realm.
- Select the enterprise domain that contains the database. Click Configure.
- The Configure Domain page appears.
- Click the Enterprise Roles tab.
- Click Create.
- The Create Enterprise Role page appears.
- Enter hr_access in the Name field.
- Click Add to add the database global role to the enterprise role.
- The Search and Select Database Global Roles window is displayed.
- Select the hr_access global role in your database. Click Select.
Note: You will be required to log in to the database before you can select the global role.
- Click the Grantees tab. Click Add.
- Then Select Users or Groups window appears.
- Select user Nasir. Click Select.
- Click Continue in the Create Enterprise Role page.
- Click OK in the Configure Domain page.
The enterprise user, Nasir, can now access the hr.employees table in the database.
Integrating OUD and EUS: Preparing Database
After preparing Oracle Unified Directory (OUD), the database itself must be prepared for Enterprise User Security (EUS). Preparing a database involves configuring the database, registering the database, mapping the user(s) or group(s) to a schema.
Preparing the database
Similar to OUD, there is more than one way to achieve this. We will use GUI.
Configuring the Database with OUD info:
Set the required environment variables for database. For example:
export ORACLE_BASE=/opt/app/db/
export ORACLE_SID=dbdev
export ORACLE_HOME=/opt/app/db/11.2.0
Run Net Configuration Assistant (netca) tool to configure OUD for the database.
On database machine, run:
$ORACLE_HOME/bin/netca
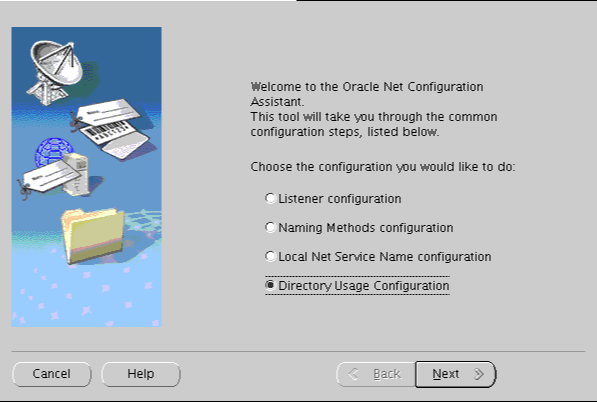
- Welcome screen is displayed.
- Select Directory Service Usage Configuration and click Next.
- Directory Usage Configuration, Directory Type screen is displayed. Select Oracle Internet Directory as the directory type and click Next.
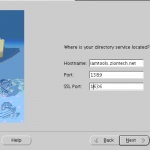
- On next screen, Enter the name of the host on which the OUD server is running, its port, SSL port and click Next.
- Select the default Oracle Context to use. Select the one that includes your base dn or you will receive TNS error while running dbca.
- Click Finish.
Screenshots for reference:


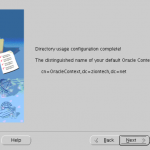
NetCA creates an ldap.ora file in the $ORACLE_HOME/network/admin directory which stores the connection information details about the directory.
Registering the database with the directory service:
The Database Configuration Assistant (DBCA) tool enables to register the database with OUD.
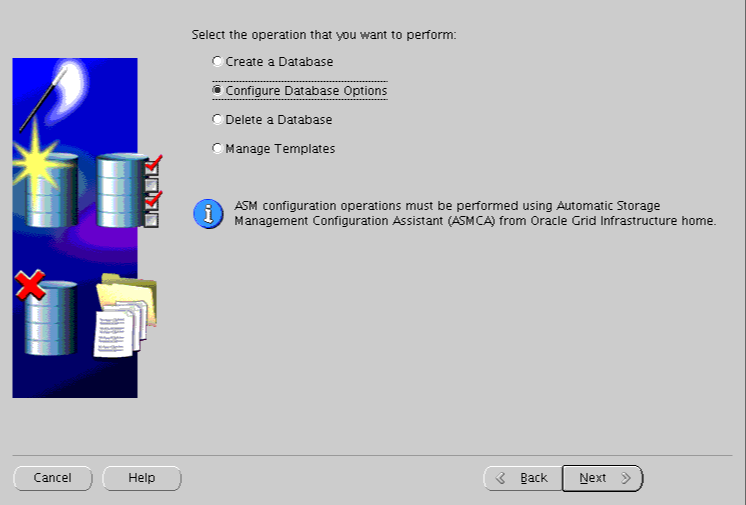
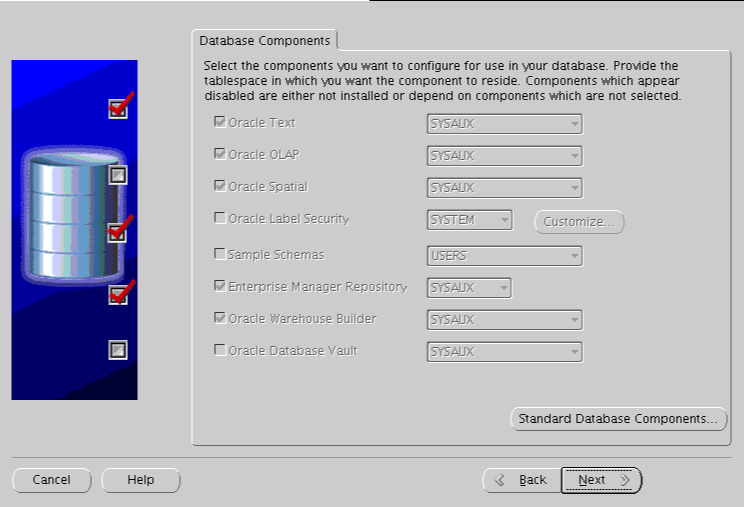
To register the database with the directory: Start DBCA using the dbca command.
$ORACLE_HOME/bin/dbca
- Welcome screen is displayed.
- Select Configure Database options.
- Select the database to which EUS will be configured.
- Click Next.
- Select Yes; register the database. Provide credentials for OUD and a password for wallet.
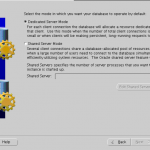
- Select Dedicated server mode and Click Finish.
Screenshots for reference:


Once the database is prepared, we need to associate enterprise users to database. Please refer to this post to learn about various user/group mappings available.
Integrating the OUD and EUS: User Identities in the OUD
To integrate the Oracle Unified Directory (OUD) with Enterprise User Security (EUS), the following has to be performed:
- Configuring EUS for an OUD server
- Modifying the OUD Configuration for EUS
- Configuring the Oracle Database for the OUD
Configuring EUS for an OUD server
EUS can be configured for an OUD server using one of the following options:
- Enabling EUS during instance creation
- Enabling EUS for an existing instance
This post outlines steps for enabling EUS during instance creation.
Assumptions:
- OUD base product binaries are already installed.
- A WebLogic domain is created for ODSM.
- An instance has yet to be created or a new instance will be created for EUS.
To setup an OUD instance using GUI:
- Change to the ORACLE_HOME sub directory for OUD (i.e., where you have installed the software)
cd OUD-base-location

Ensure that your JAVA_HOME environment variable is set.
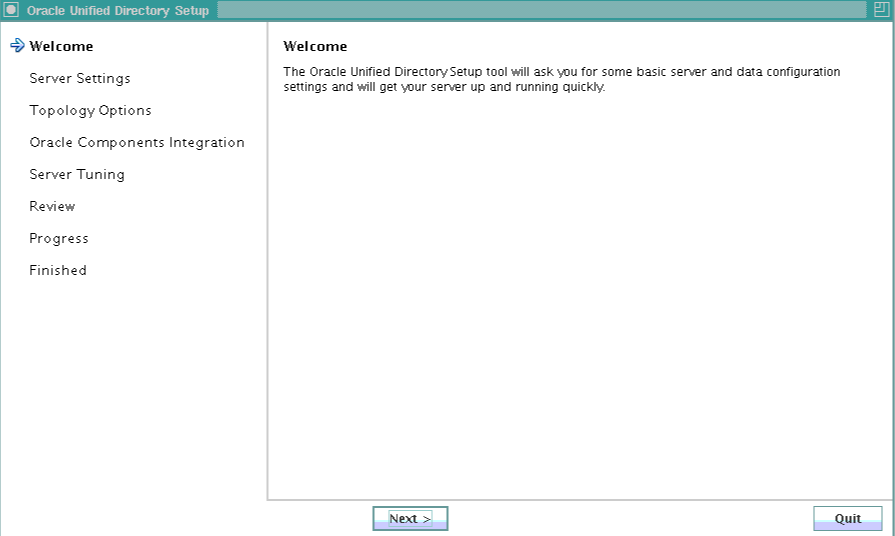
- Run OUD-setup; this will create an OUD instance.
- Click Next on first screen.
- Provide details for the server settings.
- Since enabling EUS requires an SSL, configure an SSL.
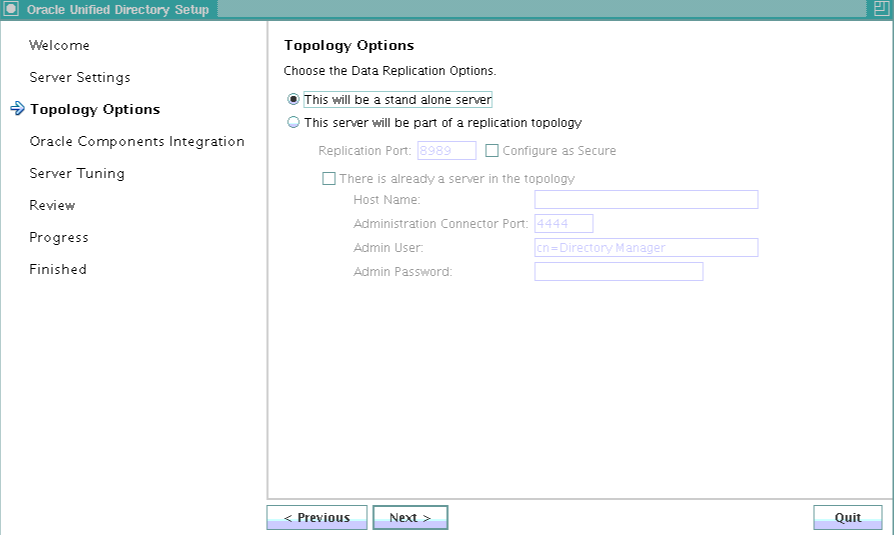
- Select your topology, if required.
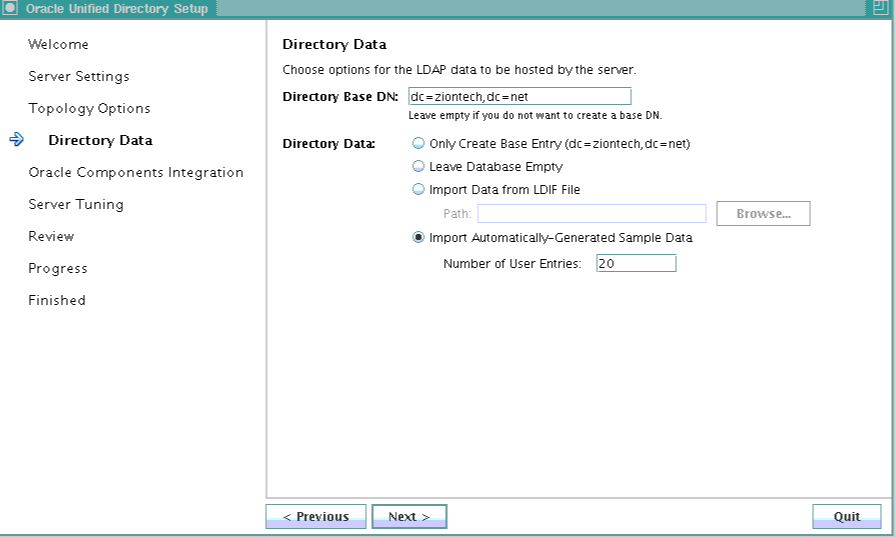
- Provide the base DN details.
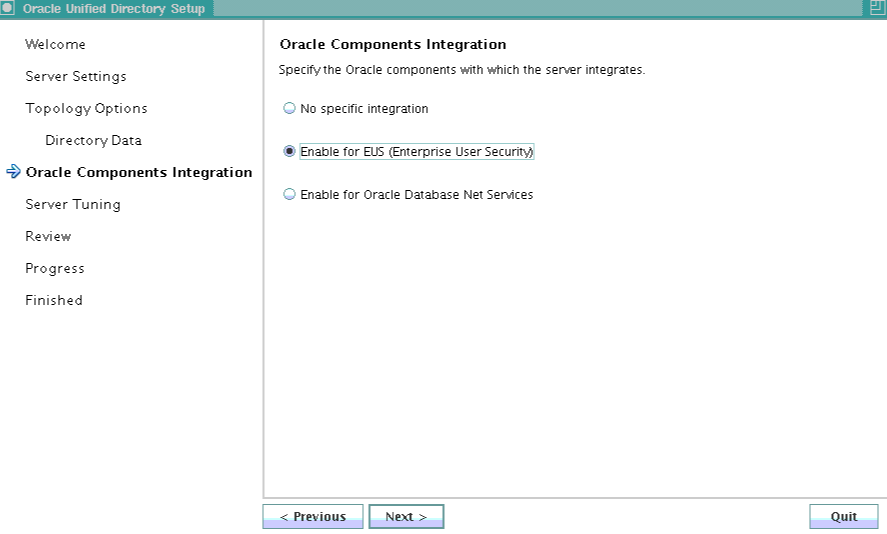
- Select Enable EUS on Oracle Components Integration screen; click Next.
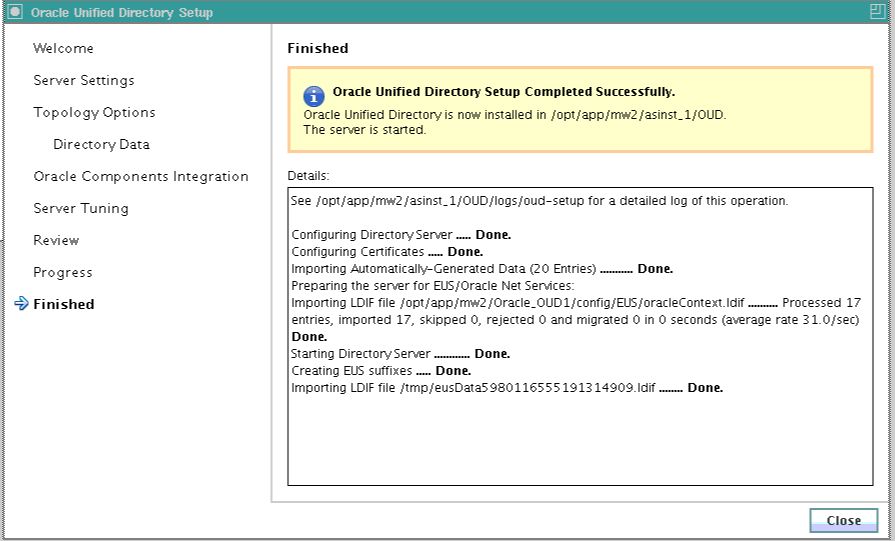
- Review your configuration details; click Finish.
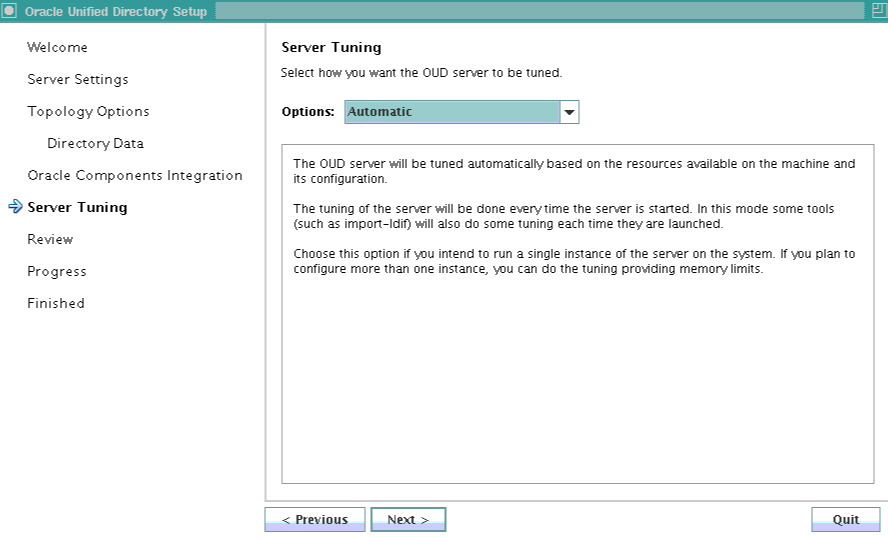
Screenshots for reference:

Login to ODSM
- Navigate to http://oud-hostname:port/odsm.
- Create a connection for the newly created OUD instance and login.
- Trust the certificate.
- Go to the data browser and validate the following:
- When EUS is selected, in addition to creating this suffix, two suffixes are created automatically: “cn=oracleschemaversion” and “cn=oraclecontext.”
- An EUS workflow element is also added in front of the local backend workflow element.
- A DN renaming workflow element for “cn=schema” is added, so that it can be accessed using the “cn=subschemasubentry” DN.
After the OUD has been enabled for EUS, the realm information must be updated in the OUD configuration by performing the following steps:
Locate the LDIF template file at install_dir/config/EUS/modifyRealm.ldif
- Edit the modifyRealm.ldif file as follows:
- Replace dc=example,dc=com with the correct naming context for your server instance.
- Replace ou=people and ou=groups with the correct location of the user and group entries in your DIT.
- Use the ldapmodify command to update the configuration with the edited LDIF template file. For example:
ldapmodify -h oud.ziontech.net -p 1636 -D "cn=Directory Manager" -Z -v -f /opt/app/middleware/Oracle_OUD1/config/EUS/modifyRealm.ldif
With this, we have an OUD instance ready for EUS. The next steps are to prepare the database and create user mappings.
Integrating OUD and EUS
This blog post provides an introduction to the Oracle Unified Directory (OUD), Enterprise User Security (EUS), and its integration. An index of all future posts on OUD and EUS integration will be available here.
What is EUS?
- Oracle’s EUS enables one to manage database users across the enterprise from a centralized location.
- Users connect to the Oracle Database by providing credentials stored in the OUD. The database executes LDAP search operations to query user-specific authentication and authorization information.
Benefits of EUS:
- Improved Productivity
- Frees user from needing to remember multiple database login names and passwords. Time spent on password reset requests is saved.
- Saves database administrators’ time. DBAs do not need to manage the same user many times (i.e., in multiple databases).
- Audit & Compliance
- Eliminates need to examine each database individually to find out who has which privileges.
- Security
- Makes it easy to verify that user access to all databases is disabled and to ensure compliance with password policy requirements.
- With EUS, user access can be disabled or removed with a single click or action.
High-level steps for EUS & OUD integration:
We can categorize this process into three steps:
- Preparing the OUD
- Preparing the database
- Associating enterprise identities with the database
Preparing the OUD:
Scenarios:
- User identities stored in the OUD
- User identities stored in an external, LDAP-compliant directory service with the OUD used as a proxy server
In a series of posts, I will cover detailed steps of both the above-mentioned integration scenarios. Please click the links below for respective blog posts:
Scenario 1: User identities stored in the OUD
Scenario 2: Using the OUD as a proxy server
Preparing the database:
Database preparation involves configuring and registering the OUD with the database. It can be achieved by using a GUI method or a command line tool.
For the GUI method, click here.
Associating OUD identities with the database:
After preparing the OUD and the database for EUS, users from the directory can be authenticated to the database. However, they have to be associated with a schema in the database. This can be achieved by using Database Control or a command line tool called EUSM.
For Database Control or the EUSM tool and various scenarios, refer to this link.
Troubleshooting
Commonly seen errors during EUS integration are discussed here.
Need help?
Do you have an EUS OUD integration project? Or, are you migrating from OID to OUD?
If you need consulting help, please reach us at support@ziontech.com.